3.10.2010

Clean Out The Cheese Drawer Pizza

IMG_6430

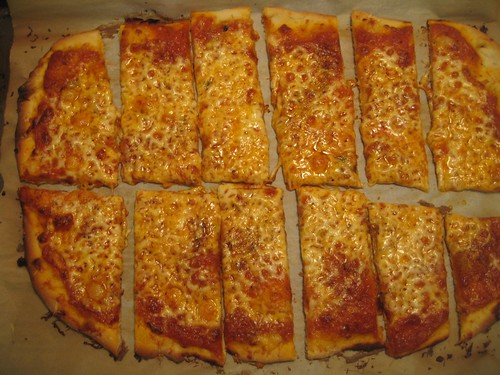
Still can't get enough homemade pizza... I'm tellin ya I guarantee I could open up your fridge and find something to throw on a pizza.  Now I will admit we eat an uncanny amount of cheese around here so that might explain why I had quite the buffet of cheese.  There was not enough of one kind to use for a recipe so I decided to throw it all on a pizza and see what happens.  And what do you know, another one I can't live without.  The tanginess of so many different cheeses with a crispy crust and robust (yeah, that's right... i said it... robust) tomato sauce is the bomb.

So anyway, sorry for no real recipe here, but I made this basic pizza dough and added a layer of tomato sauce, then mozzarella, cheddar, parmesan and topped it off with grated gruyere and salt and pepper.
IMG_6432

Here is the other pizza below. 
IMG_6433

3.08.2010

Chicken Tortilla Soup

IMG_6504
So we are almost at the end of soup season and I apologize that I am just now sharing this because it is one of my very favorites (oh yeah, and sorry for those of you who are not near the end of winter, but the tides will turn come July when I can't breathe in a tank top because it is so hot and humid).
Chicken tortilla soup is one of those that has been interpreted in a thousand different ways. I prefer mine with a tomato broth base and to have a little bit of chunkiness to it. If I have one thing to say, it is don't skimp on the toppings. The soup is delicious, but the tender chunks of chicken, tangy cheddar, creamy avocado and crunchy tortilla strips are what will knock your socks off.  This is not the quickest version, but I do think it is one of the best, so I find it worth the time to make a batch and freeze half for later.

The original recipe calls for boiling the chicken, which is something I will never go back to after I discovered this.  Of all the ways I used my new, favorite roasted chicken, this might be the best one.  So if you are following me here... get one of these, make this, and then make this soup.

From my little kitchen to yours... Enjoy.
IMG_6489IMG_6490
IMG_6491

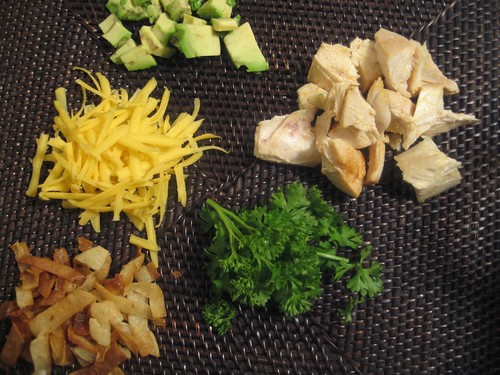
the yummiest part... the toppings
IMG_6502

Chicken Tortilla Soup
Adapted from the Mansion's Tortilla Soup
Recipe Notes
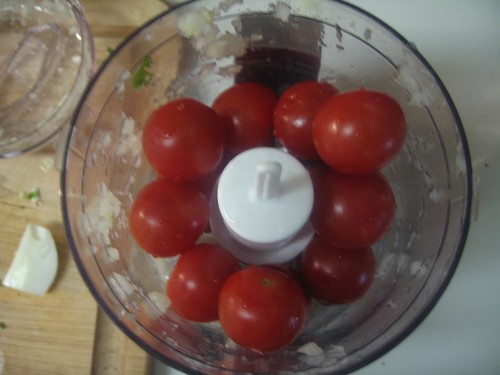
There are a couple of fussy steps to this one, so it might seem to be a little time consuming at first, but I promise it is worth it.  I adapted this recipe from here, but my favorite twist is to roast the chicken.  The flavor and tenderness from this method is unmatched.  In the past I have used regular plum tomatoes to puree, but this time, I had small cherry tomatoes on hand so I used them.  Moral of the story... any tomato will work.
Ingredients
3 tablespoons corn oil
4 corn tortillas, coarsely chopped
6 cloves garlic, finely chopped
1 tablespoons chopped fresh cilantro
1 cup fresh onion, pureed
2 cups pureed fresh tomatoes
1 tablespoon ground cumin
2 teaspoons chili powder
2 whole bay leaves
4 tablespoons canned tomato puree
2 quarts chicken stock
salt
cayenne pepper
Toppings
1 cup cooked chicken, cut into small chunks (click here for recipe)
1 avocado, peeled, seeded and cubed
1 cup cheddar cheese, shredded
3 corn tortillas, cut into strips and fried (directions below)
Step by Step
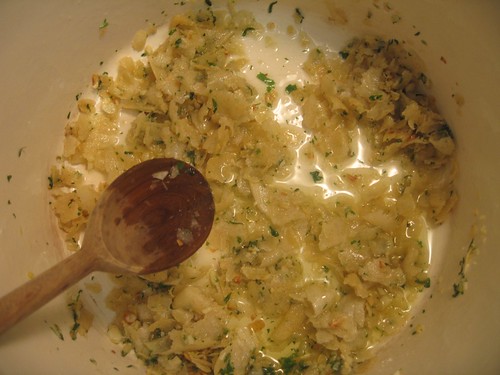
Heat oil in a large saucepan over medium heat.  Saute tortillas with garlic and cilantro over medium heat until tortillas are soft.

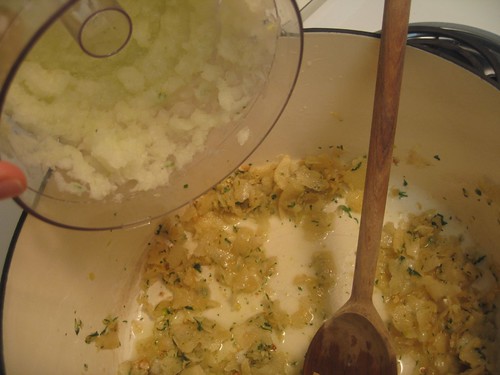
Add onion and fresh tomato puree and bring to a boil.  Add cumin, chili powder, bay leaves, canned tomato puree and chicken stock.  Bring to a boil again, then reduce heat to simmer.  Add salt and cayenne pepper to taste, and cook stirring frequently for 30 minutes.  Skim fat from surface, if necessary.

To make crunchy tortillas strips
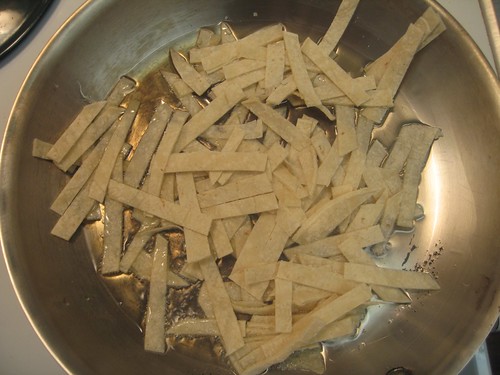
Heat a thin layer of corn oil over medium high heat.  Cut three corn tortillas into thin strips.
IMG_6496
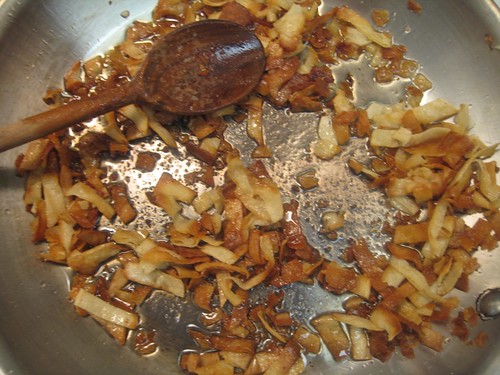
Lightly fry tortilla strips in oil.  Remove strips when they are golden brown and allow to drain on a paper towel to remove excess oil.  Lightly sprinkle with salt and pepper and allow to cool.
IMG_6498
IMG_6499

3.02.2010

The best home cooked chicken I have ever had.

IMG_6493
Okay, enough about cookies... this is important.  I believe I have discovered the best way to cook chicken ever! And I do hope you are soaking in the gravity of this situation because it has changed so much.  This and this have both been given more flavor and the possibilities are endless.  I have never had much luck with chicken and have been on a kick to find better ways of cooking.  I'm a little worried I won't continue my quest because I love this roasted chicken so much.  It is simply roasted chicken.

I have always been a boneless, skinless chicken breast kinda gal.  I knew there were other cuts with more flavor and versatility, but I have a tendency to get a little funny about meat.  I would rather not deal with bones and skin... until now.  So when I started cooking things that needed chunks of chicken, I would just boil the chicken like I did here.  I think my boiling days are over.

And also I would like to mention that this is the quickest and least messy method I have found too.  To borrow a phrase from Ron Popeil (who I use to have a weird obsession with... yes, I do own a food dehydrator and the must-have counter top rotisserie)  "set it and forget it."

This is why my trusty little meat thermometer has also changed everything.  I can literally pop the thermometer in a piece of chicken, and the timer will go off when the chicken is at a perfect internal temperature.
IMG_6487

Roasted Chicken
Recipe Notes
You can season this chicken with whatever you want.  If you are putting it in a Mexican dish, think about adding some chili powder or extra garlic powder or if it's Italian,  maybe add some extra fresh herbs... no matter what, you really cannot mess this up.  If you are planning on eating the skin, you might want to be a little careful with how much salt you use, but if you will be discarding the skin, the more seasonings the better to cook into the meat.  If you do not have a meat thermometer, you can roast for about 45 minutes to an hour, depending on the size.  
Ingredients
Bone in, skin on chicken breasts (also called split chicken breasts)
olive oil
Kosher salt and pepper
Garlic powder
Other herbs and spices, optional
Step by Step
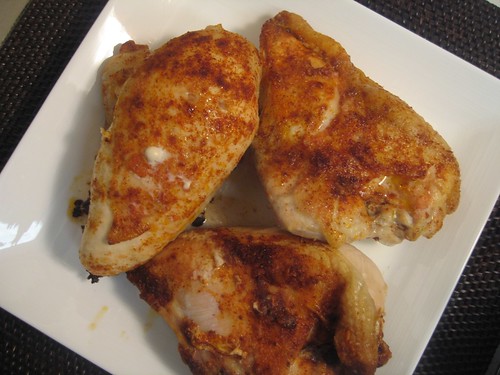
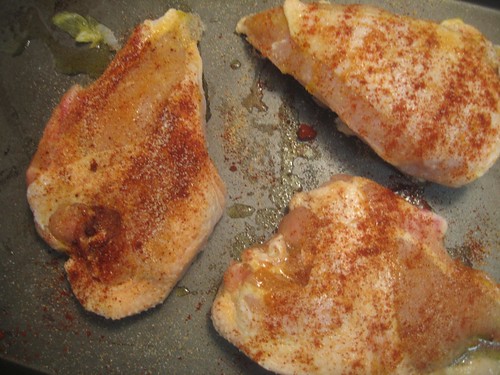
Preheat the oven to 375 degrees.  Lightly spray a baking sheet with edges or a roasting pan with cooking spray or lightly coat with olive oil.  Spread chicken in a single layer on baking sheet.  Rub each breast with a little bit of olive oil.  Heavily salt and pepper the skin.  Sprinkle with garlic powder as well and any additional herbs or spices you would like to use.  Stick one of the breast with a digital meat thermometer and set thermometer for an internal temperature of 150 degrees.

So whether you want to serve this with some veggies for dinner or cut it into chunks for a soup or salad, give it a try... I think you will be thrilled.

From my little kitchen to yours... Enjoy.

You can roast this chicken with some veggies to have a complete meal ready when the chicken is done...
IMG_5650
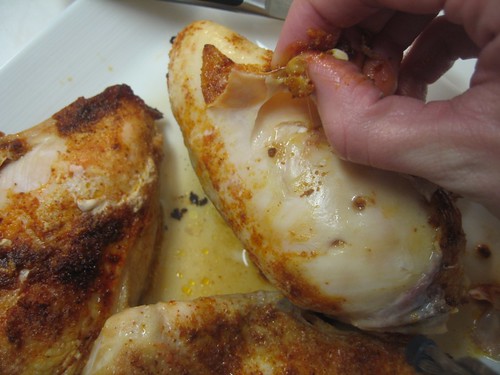
...or you can remove the skin, and cut it into chunks for a casserole or salad.  My personal favorite.

IMG_6495

little kitchen loves... Martha's Meat Thermometer

IMG_6585
Does your chicken ever look like it is a victim of violence by the time you are ready to serve it?  Ya know, you have stabbed it so many times to check for doneness that it looks wounded?  Well, maybe this is just a personal problem for me, but growing up with a father who was infamous for constantly saying "You don't mess with chicken," I have always been deathly scared to serve undercooked chicken.   However, overcooked chicken is tough and dry so I have always been in a pickle about this.  Every piece of meat is different so how can you cook it just right?!  I have found the answer... a meat thermometer.  Now I know this sounds like another duh moment, but I did not realize how much I would use this little sucker.  I always thought meat thermometers were pricey and something that would just sit on the shelf.

I picked this Martha Stewart thermometer up from Macy's and it has been a life saver.  I am always wary of buying new gadgets that never get used, but now I can't live without this, and don't worry, it's only $24 so you won't be making a huge splurge with this one.  I know there all are kind of great and high tech versions out there, but this one has worked just great for me.  I am able to pick a target temperature, stick it in the meat, and close the oven.  An alarm goes off when the meat is at the perfect internal temperature and voila... perfect meat every time.  I have even used it to test for lukewarm water for my pizza dough. I'm telling you, it's a dream.

In case you are new here, Ashlea's Aisle is simply my favorite products that help me out on a daily basis.   I just like to share things that I find to be useful and this meat thermometer is something I cannot live without.  I am not being sponsored by any of these products, so there is no incentive to me... just like to share what seems to work for me!

2.26.2010

Perfectly Iced Sugar Cookies

IMG_6454

Here it is! The sugar cookie recipe (if you can call this a recipe) and a great way to ice them.  I have to giggle at all of the nice, but firm comments that have been left about wanting the recipe, but  you are going to giggle when you see how easy this is.  I have to thank my friend Katie's mother, Mrs. McAfee, for sharing this with me.  All through college, Katie would receive the most darling sugar cookies and I was just sure they were from a bakery, but it turns out her mom would whip them up all the time.  After several attempts of making sugar cookies that wouldn't keep their shape and canned icing that you would have thought a kindergartner schlepped on them, I got up the nerve to ask Mrs. McAfee for her secret recipe.  She was more than happy to share with me this "secret" recipe, which turned out to be a bagged cookie dough.  I could hardly believe it... they were so tasty and seemed so special.  Although this is basically a mix, I look at it as simply pre-measured ingredients.  You are still adding your fresh eggs and butter so there is a distinctively different taste from the refrigerated cookie dough. It turns out there are slightly different directions for "cutout cookies" on the back of the bag, which helps the cookies keep their shape and make that thin perfect cookie.  So here you are, get yourself a bag and get crackin.

I am by no means am a great baker, but I have found success with royal icing and the more times I have tried it, the better it gets so I will share what I have learned.

From my little kitchen to yours... enjoy.

Cutout Sugar Cookies
Recipe Notes
The technical term for this icing that goes on liquid and dries hard is royal icing.  It allows you to get that smooth glossy look.  Mrs. McAfee told me she just uses powdered sugar and milk with a pinch of salt.  You just mix in milk to the powdered sugar till you get a thick, but liquidy mixture.  After researching royal icing, I found that a lot of people used meringue powder.  I decided to use this in my icing and loved the results.  I purchased it from Michael's craft store, but you could also get it at specialty baking stores.   So if you are just experimenting, you could start with milk and powdered sugar or delve into the world of meringue powder and follow the directions below.

More on the icing...
Start with the ingredients below, but then make adjustments according to how your icing looks.  You want a liquid substance, but not thick enough to hold when you outline the cookies.  You can easily change the consistency by either adding a few drop of water to make it more runny or more powdered sugar to thicken it up.
Equipment
small squeeze bottles or a piping bag fitted with a small tip
small bowls or tupperware, one for each color icing you would like
Ingredients for dough
Betty Crocker Sugar Cookie Dough
+ Ingredients listed on the back of the bag under Directions for Cutout Cookies
Ingredients for Icing
3 cups confectioner's sugar (powdered sugar)
3 tablespoons meringue powder
4 tablespoons water or milk
a pinch of salt
Step by Step
Follow directions on back of bagged cookie dough and allow to cool completely.
*A note about the cookies... when these cool, they will actually be on the crispy side.  Do not throw them away! They magically become soft again when you ice them and let the icing soak into the cookie.

Mix all icing ingredients on low speed for 5 to 7 minutes or until the icing loses its shine.  To test the consistency, pick up some icing with a spoon and let it drizzle back intot he bowl.  The drizzle should disappear back into the bowl in about 6 seconds.  If icing is too stiff, add a few drops of water. If icing is too liquid, add a bit of powdered sugar.  Optional: If using different colors, divide icing into separate bowls.  Add color to icing and cover until ready to use.

*If you will be using a lot of different colors or will be icing for a long time, make sure and cover any icing that is not being used because royal icing dries and hardens when exposed to air.
Icing A Sugar Cookie
Outline the cookie with a piping bag fitted with a thin tip or a small squeeze bottle. 
IMG_6435
Allow the border to dry slightly.
IMG_6436
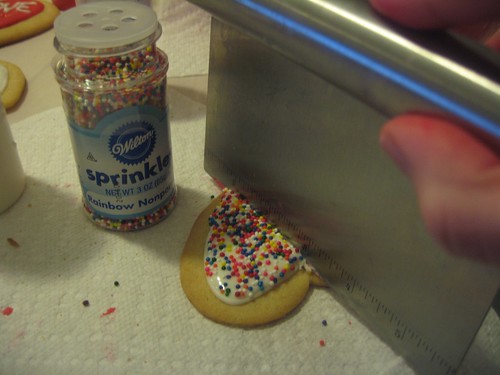
Flood the cookine by spooning icing into the middle and smoothing it out with a spoon or knife.
IMG_6446
If adding sprinkles, do so before icing hardens.  Allow icing to harden for at least a few hours.  If adding another layer, wait until first layer is completely dry and hardened.  
IMG_6448
Kinda fun to do half with sprinkles to switch it up a bit...
IMG_6466

IMG_6467

2.23.2010

Pesto Pasta Salad with Feta & Tomatoes

IMG_5656
This little pasta salad seems to be just what almost any party needs.  It comes together so quick, which is essential for you, but it seems to be a star.  Yep, a real star.  There is something addicting about the combo.  Almost like a pizza, but fresher.  Yeah, that's it... fresher pizza.  All of the flavors, but none of the grease.  Who wouldn't want the flavors of pizza served in a dainty form?

From my little kitchen to yours... Enjoy.

Pesto Pasta Salad with Feta & Tomatoes
Adapted from Dave Lieberman
Recipe Notes
Marinated mozzarella balls from Costco are amazing in this dish.  Feta provides a great kick if you do not have that option. To make this extra quick, you can use store bought pesto.  The pesto can make or break this pasta so you want to use a good one if you choose to do so.  Two fresh ones that I like can be found at Central Market on the fresh dip and sauces aisle or Costco has a great pesto as well.
Ingredients
1 pound bow tie pasta (also called farfalle)
3/4 cup pesto
1/2 pint cherry tomatoes, halved
1 cup crumbled feta cheese or 1 cup marinated mozzarella balls, cut in half
1/2 cup pine nuts
kosher salt and pepper
olive oil, as needed
Step by Step
Toast pine nuts. Preheat oven to 400 degrees. Spread pine nuts in a thin layer on a baking sheet and toast until golden brown. Watch carefully so that they do not burn. Shake the baking sheet if necessary to get them browned evenly.

Bring a large pot of salted water to boil. Stir in the bow ties and cook, stirring occasionally, until al dente, about 10 minutes. Drain the pasta and run it under cold water just until it stops steaming. Drain the pasta well to remove all excess water.

Dump the pasta into a large serving bowl. Stir in the pesto until the pasta is coated. Toss in the cherry tomatoes and the crumbled feta. Season to taste with salt and pepper. You can make the salad up to about 1 hour before you serve it. Check out the salt and pepper just before you serve the salad. If it's looking a little dry, add some olive oil and stir it around.

To do more prep work in advance, you can make the pasta the day before. Follow the directions on cooling the pasta and draining. Drizzle with olive oil and toss so that the noodles do not stick together. Refrigerate until ready to use.


Pesto:
5 big handfuls basil leaves (about 2 hefty bunches
1/2 cup pine nuts or 3/4 cup walnuts
1/2 cup fresh grated Parmesan or Pecorino cheese
Juice of 1 small lemon
2 cloves garlic, peeled
Kosher salt
About 20 grinds freshly ground black pepper
3/4 cup extra-virgin olive oil

Place all ingredients with 1/2 cup of the oil in a blender and blend. Gradually drizzle in the remaining 1/4 cup of oil until pesto is thick and smooth.

Yield: about 1 1/2 cups
IMG_6309
IMG_6311
IMG_6314
IMG_6316
IMG_6324
If you have any leftover ingredients, you could make this tomorrow night for dinner!