4.26.2010

lemon lime tea cakes

IMG_6943
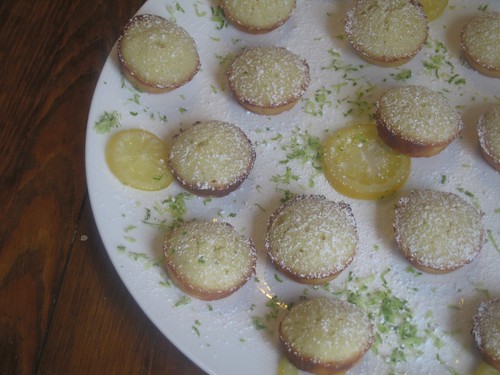
And so it continues... my preoccupation with bite sized fare.  I won't go on and on again for all the reasons I love things in mini portions, but these are perfect for so many occasions.  I had an order for some bite sized food for a baby shower and I remembered about these mini tea cakes my friend Lea had told me about.  They turned out to be the perfect spring treat and they are so easy.  I was thinking about whipping up a couple of batches for Cinco de Mayo.  They just seem like the perfect treat for a fiesta... My only warning:  You might want to consider tripling or quadrupling this recipe... the go very, very quick.  
IMG_6935
IMG_6936
IMG_6937
Lemon Lime Tea Cakes
Adapted from Everyday Food
Ingredients
Cooking spray or butter for coating pan
1/2 cup (1 stick) unsalted butter, room temperature
1 1/3 cups sugar
1 teaspoon finely grated lemon zest, plus 1 teaspoon fresh lemon juice
1 teaspoon finely grated lime zest, plus 1 teaspoon fresh lime juice
2 large eggs
1 cup all-purpose flour (spooned and leveled)
1/4 teaspoon coarse salt
1 large lemon (ends cut off), very thinly sliced and seeded
2 tablespoons lime zest (optional: for garnish)
Powdered sugar (optional: for garnish)
Step by Step
Preheat oven to 350 degrees and place a baking rack in the top 1/3 of the oven. Lightly coat a 24-cup mini-muffin pan with butter or cooking spray. In a large bowl, using an electric mixer, beat butter, 2/3 cup sugar, and lemon and lime zests on medium speed until light and creamy, but not fluffy. Add lemon and lime juices along with eggs and beat to combine, scraping down bowl.  Gradually add flour and salt and beat until blended on low speed. Divide batter among muffin cups (about 1 tablespoon each). Bake until cakes are golden around edges and a toothpick inserted in center comes out clean, about 15 minutes.

While mini cake are baking, combine 2/3 cup water and 2/3 cup sugar in a medium size pan.  Cook over medium heat, stirring occasionally, until sugar dissolves, about 5 minutes. Add lemon slices and rapidly simmer until peel turns translucent and lemon syrup thickens slightly, 5 minutes.
With a toothpick, poke holes all over tops of warm tea cakes in pan. Drizzle 1/2 teaspoon lemon syrup over each cake. Let cakes cool slightly in pan; transfer to a wire rack to cool completely.

To plate, place candied lemons on a platter.  Place tea cakes on top and sprinkle with powdered sugar and lime zest.  

4.21.2010

Herbed Goat Cheese Stuffed Tomatoes

IMG_6391
I am starting to have a serious urge to prepare everything bite size.  Every time I see a cake or an appetizer dip, I start thinking about how I could make it into mini portions.  Not sure what this urge has to do with, but I'm goin with it and I have a couple of bite size sussies to share with you. 

Maybe it has something to do with being at a party or restaurant and not sitting close enough to the appetizer. You know, you are at a long table and you just feel like a beef cake if you reach over 4 people one more time to get another nacho.  Or you are at a cocktail party and you are trying to balance a glass while taking a bite of something with a tiny little fork all the while trying you are trying to keep up conversation with people you barely know.  So here's my solution.  This way, everyone can either get a few bites or make a balancing act a little bit easier.

I made these for a ladies luncheon a couple of months ago and everyone seemed to really enjoy them.  I think my above point was proven because these went way faster than the pasta salad or fruit, which required a fork.


From my little kitchen to yours... Enjoy.
IMG_6387
Herbed Goat Cheese Stuffed Tomatoes
Adapted from here
Ingredients:
24 cherry tomatoes, a mixture of red and yellow if possible
1/4 lb. chevre (fresh goat cheese)
1 tsp. half and half
1/8 c. basil, minced
1/8 c. parsley, minced
1/2 tsp. salt
1/2 tsp. freshly ground pepper
Directions:
Cut a circle in the top of each and with a small spoon or the edge of the knife, scoop out the juice and seeds. This should produce a sturdy, hollow shell.

In a small bowl, combine the remaining ingredients and mix until combined. Using a small spoon, a pastry bag fitted with a small tip, or a ziploc bag with the corner cut off, fill each tomato with the herbed goat cheese mixture.

Just plate and serve.  These can be made the night before and refrigerated until ready to serve.

4.18.2010

Little Kitchen Renovation

IMG_6809
Okay, so I know most people use the word renovation when they are knocking down walls and redoing cabinets but for one, I'm not most people and for two, this first little renovation has helped me so much that I feel like it is significant enough to be called one.
IMG_6810
So here is my new spice rack.  Oh, I'm just thrilled about it for quite a few reasons.  I was first inspired to do this after I bought my 3rd bottle of paprika only to discover that I already had some, but just couldn't find it in the chaos of my cabinet.  With my limited cabinet space, this has also given me another shelf in the pantry, which is prime real estate in this tiny tot space.  And, I just think it's so darn cute.  I have included the details of the project below and I have to give Mr. Hungry all the credit for the actual execution of this one.  It was written all over the woman's face at Home Depot, who was helping me gather materials, that she thought there was no way I could pull this off.  Little did she know I had Mr. Hungry at home who has a high interest in me liking our kitchen (the more I like, the more I cook) and knew just what to do with the brackets and assorted screws that I brought home.  There are a few other projects I am tackling to make this renter's kitchen more bearable so I'll be back with more.
IMG_6811

Still can't do anything about this eye sore of a microwave. There are days when I think about just chunking it because it is so ugly, but Mr. Hungry would have a cow if he didn't have a way to make easy mac cups or heat up leftovers.
IMG_6856
The shelves: The shelves were simply one piece of wood I had cut into 3 even pieces by the fine people at Home Depot.  I bought plain white paint and gave them a couple of coats.


How they are hanging:  They are hanging with tiny L brackets.  If you are really interested in more specifics, you can email me and I can ask Mr. Hungry (I was not allowed in the kitchen during this process... apparently, I am not as helpful as I think I am when it comes to such projects... but don't get me wrong, I'm also thankful that I'm not needed... no problems here)

Spice jars:  Bought these at Ikea for 4 for $3.99... pretty darn good deal if you ask me.

Labels:  They are Martha Stewart labels sold at Michael's.

And the good news... this was all done for under $30, which is cheaper than most spice racks you can buy (which I don't like anyway because they take up valuable counter space).


This doesn't look like the terrible "before shot" that it really was before I forgot to take a pic of this disheveled shelf before I took out all of the spices, but trust me, it was bad.  When I was first trying to organize, I bought these little mini risers, but they quickly bent and really just weren't providing the organization I was looking for. 
IMG_6678

4.13.2010

a non-dairy cake

IMG_0352

Anyone out there that can't eat dairy?  First of all, let me say that I would equate hearing the news that I can't eat dairy, with the news that I was going to lose my right arm. A life without cheese and ice cream seems like a world without laughter.  Okay, so I'm being quite dramatic, but I am daily hearing of more people who have allergies to milk and oh how I feel for you.

A mom recently came to me and asked if I could come up with a cake without dairy.  Her son is allergic to a protein in milk and she wanted to order a birthday cake.  I admitted I would be treading in unchartered waters, but I would give it a shot.  I found a great cookbook called My Sweet Vegan, and thanks to all the weird ingredients they carry at Whole Foods, I was able to pull this off.  If I ever had to live in a non-dairy world, now would be the time because it seems like there are more possibilities to get around dairy than ever before.

Sidenote:  This is the first time I have posted a recipe that I haven't tried, but the family assured me it was delicious, and as I hear more and more people who cannot eat dairy, I decided to go ahead and share this.  If you have success, please let me know.

From my little kitchen to yours... Enjoy.


Silken Chocolate Mousse Cake
Adapted from My Sweet Vegan by Hanna Kaminsky
Recipe Notes
The original recipe calls for Extra Firm Silken Tofu, but I couldn't find that exactly.  If you are use to dealing with tofu, you might know where to find this, but my options were either Silken tofu or Extra Firm tofu. I chose silken for the texture over Extra Firm.  If you make it with silken, be prepared for a very soft cake.  You need to keep it in the refrigerator up until the moment you serve it.  Maybe even stick it in the freezer for a few minutes before.  If you are serving this at a place where the cake will be out of refrigeration for awhile, I would suggest not making this (if you cannot get extra firm) because it will get really soupy.   Also, almond meal is kind of expensive, but if you go to a place like Whole Foods, you can buy it in bulk and purchase only as much as you need for this recipe.
Ingredients
Crust
1 1/2 cups almond meal
1/3 cup dutch process cocoa powder
1/4 cup light corn syrup
3 tablespoons canola or vegetable oil
Chocolate Mousse
2 12-ounce packages Extra Firm Silken Tofu (see recipe notes)
1/2 cup dutch process cocoa powder
3/4 cup granulated sugar
1 tablespoon light corn syrup
1 tablespoon vanilla extract
pinch of salt
12 ounces vegan (or non-dairy)  semi-sweet chocolate chips

1 bar dairy free dark chocolate

Special Equipment
9 inch round springform pan
Step by Step
Lightly spray the bottom of a 9 inch round springform pan with cooking spray.  In a medium sized bowl, combing all ingredients for the crust and mix until well combined and a moist dough forms.  Press crust into the bottom of the springform pan and press until it evenly covers the bottom of the pan. Refrigerate crust for 5 to 10 minutes, while preparing the filling.

Drain excess liquid from the tofu and place in a blender or food processor.  Puree until smooth and add cocoa, sugar, corn syrup, vanilla, and salt.  Pulse until well combined.  Place vegan chocolate chips in a microwave safe bowl and heat for 30 second intervals until melted.  Stir chocolate chips between intervals so that the chocolate doesn't burn.  Pour melted chocolate into tofu mixture and blend for 2 to 3 minutes.  Scrape down sides and continue to blend until a smooth and well combined mousse is formed.

Pour the filling into the chilled crust and smooth the top.  Return the cake to to the refrigerator and allow to chill for at least 3 hours.  Release the springform sides of the pan just before ready to serve.  To add the finishing touches, shave the dark chocolate bar with a vegetable peeler and top cake with a thick layer of the shavings.

4.09.2010

The Perfect Breakfast Sandwich

IMG_6802

These little sussies have given me a whole new reason to get up on Saturday mornings.  It's actually kind of sick.  Since I first made these a couple of weeks ago, I start to dream about these mid Thursday when I know a slow Saturday is upon me and I can get up and make these.

Breakfast casseroles rarely do the trick for me.  That fact is mostly due to the fact that I dont't like eggs. I know, I know... I'm weird, but this has often left me out of enjoying the main dish at breakfasts/brunches because eggs are usually the star of the show.  And don't even get me started on all the late night I've missed out on too.  I am still petitioning that Whataburger have a taquito with no egg.  Don't they get it?  Not everyone likes egg!! ...just had to get that off my chest... moving on.

And I know there are just as many out there who might not like bacon or might not like cheese so these little sammies can be adjusted to your liking. I have turned the corner a little bit and I do like egg whites so I simply make that adjustment for mine.  Moral of the story... egg or egg white... canadian bacon or bacon... cheese or no cheese... the possibilities are endless and you can make them individually so everyone gets exactly what they like.

From my little kitchen to yours... Enjoy.
IMG_6801


English Muffin Breakfast Sammies
Recipe Notes
Like I mentioned before you can easily substitute all of these ingredients below.  Other combinations I have tried include bacon instead of canadian bacon, egg white instead of egg, and just canadian bacon and cheese.
Ingredients
1 english muffin, halved
1 teaspoon of butter, softened
2 slices of canadian bacon
2 sandwich slices of cheddar cheese
1 egg, scrambled
Stepy by Step
Lightly butter each side of the english muffin.  Toast in oven or toast until slightly brown and crispy. If you like your breads extra crispy, cook a little bit longer. 
While english muffin is toasting, cook the canadian bacon over medium heat in a nonstick skillet for about 2 minutes on each side. Remove the canadian bacon and keep warm.  Lightly spray nonstick skillet with cooking spray and heat back to medium heat.  While tilting the nonstick skillet, pour scrambled egg on to one side of pan.  Using a fork, continue to scramble the egg while it cooks, and form into a circle, about the size of the english muffin.  Tilting the pan will help keep the egg in one area of the pan.  Salt and pepper the egg patty.
Set the oven on broil.  Place each side of the english muffin on a baking sheet.  One one half stack the egg, canadian bacon and a piece of cheese on top.  On the othe half, stack a piece of canadian bacon and the other slice of cheese.  Broil for a couple of minutes until the cheese is melted and bubbly.  Remove from the oven and combine halves.

Serve hot.

IMG_6804

4.01.2010

Pork & Chive Pot Stickers

IMG_6723

And I quote, "This is the absolute best thing you have ever made." 

The context:  I made these potstickers for dinner and these were the exact words Mr. Hungry used as he looked at me with the most wide eyed happy face I have seen in awhile.  I don't think there is much more I can say to tell you how good they are (oh yeah, except I absolutely loved them too) so I will go on to trying to convince you to make these.  I could literally see the loss of interest in people's faces when I told them about these little sussies and I blame that wholly on the fact that the minute you hear about something you have only had in a  restaurant, you assume it is too complicated to be on anyone's list of things to try.
IMG_6705
Well, let me tell you that couldn't be farther from the truth.  These are so easy and more than that, they were pretty fun to put together.  I don't have any munchkins of my own, but I have a feeling kids would love to help you make these for dinner.  Kind of makes we want to have children of my own so I could have a little assembly line of dumpling makers and crank these out by the hundreds.  (Okay, before you call Child Protective Services on behalf of my future children, I'm just joking...kind of).
IMG_6706
Previously, I found my favorite version at our local grocery store (name to remain anonymous because of the rest of this story).  The small problem is the hair that Mr. Hungry found in his last batch that we got from there so I decided I needed to come up with my own.  And I actually prefer knowing exactly what goes into these.  As Mr. Hungry explained it, he says half the joy of eating the homemade version is not having to be worried about biting into something weird.  Moral of the story... these are actually the best pot stickers I have ever had including restaurant and store bought versions and I am extra happy to avoid the mystery of what is inside. 


IMG_6707


IMG_6708

IMG_6712
IMG_6715

IMG_6718


IMG_6720
IMG_6730
Pork & Chive Pot Stickers
Adapted from Everyday Food
Recipe Notes
The key to making these really tasty is to let the fry up for awhile until they are golden brown and crispy.  If you are unfamiliar with wonton wrappers, they can be found in most any grocery store in the refrigerated section.  At my grocery, they are located next to the herbs and mushrooms. 
Ingredients
1/4 pound ground pork
1 tablespoon minced chives
1 1/2 teaspoons soy sauce
1 1/2 teaspoons dry sherry
1 teaspoon minced peeled fresh ginger
1/2 teaspoon sesame oil
1/2 teaspoon cornstarch
1/2 teaspoon salt
20 wonton wrappers (from a 12-ounce package)
1 tablespoon vegetable oil
Soy-Ginger Dipping Sauce
1/4 cup soy sauce
3 tablespoon rice vinegar
1 tablespoon minced peeled fresh ginger
2 teaspoons sugar
1/4 teaspoon sesame oil
Step by Step
 In a bowl, combine pork, chives, soy sauce, sherry, ginger, sesame oil, cornstarch, salt and 1 tablespoon water.  Place an overflowing teaspoon of the pork mixture in the center of the wonton wrapper.  Lightly wet the out edge of the wonton wrapper and press together to seal, forming a half moon.  Place on parchment paper or wax paper to keep from sticking to the counter.  Repeat with remaining dumplings.

Cook dumplings in two batches so they do not crowd the pan.  Cook in boiling water until cooked through, about 5 minutes.  Transfer to a plate with a slotted spoon or an asian strainer.  Heat vegetable oil over medium-high.  In two batches, cook until golden brown and slightly crispy, about 2 minutes per side.  Serve with dipping sauce.

To make Dipping Sauce
In a bowl, stir together all ingredients listed above.  

To Freeze:
Prepare through the first paragraph (prepare, but do not boil) and freeze between layers of parchment paper in an airtight container.  When you are ready to make them, take them out of the freezer and continue with the steps.  You can stick them right in the boiling water in their frozen state.  Allow to cook a few extra minutes.