5.30.2009

Weekend Update: Topsy Turvy Tomato Planter... Week 3

Here we are in Week 3 of the Topsy Turvy Tomato Planter.  I am still filled with lots of hope, but must report I see no signs of even the tiniest tomatoes.  I guess I am staying optimistic because the directions do report that it takes 6 weeks to see tomatoes.  All I know is we have a long way to go if this little tike is going to look anything like that tomato explosion on the infomercials.  Stay tuned!

5.27.2009

All Natural Peanut Butter Yogurt

I will go ahead and say this recipe is not for everyone.   I personally love it and think it is a great snack, but have found some people are not a fan... Mr. Hungry being the biggest non-fan.   I found this recipe a long time ago in a dieting book called The Formula that my parents were using.  While I have never been on the diet it recommends, I have made this yogurt for years.  It is a part of the 40-30-30 diet (or zone diet), which promotes eating meals and snacks that have 40% carbohydrates, 30% protein and 30% fat.  I love that the yogurt uses all natural ingredients and because of the portions, seems to really fill me up.  These are not all ingredients you would have on hand, but I use protein powder for certain smoothies as well so have found it to be a good investment.  It is more expensive than most products I buy, but one can will last a very long time.   
All Natural Peanut Butter Yogurt
4 Servings
Recipe Notes
Using all natural fructose is a healthier alternative to table sugar.  Bob's Red Mill makes a granulated fructose that can be found in alot of grocery store.   I buy protein powder at Whole Foods, but can now be found in most grocery stores in the health food aisle as well.  The original recipe is for one serving.  I have adapted this to make four servings so I can make once, and eat throughout the week.  
Ingredients
32 oz. tub of nonfat plain yogurt (4 cups)
4 tablespoon all natural peanut butter, room temperature
8 teaspoons granulated fructose
2 tablespoons pure whey protein powder
Directions
1.  Combine all ingredients in mixing bowl or blender.
2.  Whisk or blend until smooth and creamy.
3.  Divide into four containers and refrigerate until ready to eat.

5.25.2009

Southwestern Breakfast Cups... Happy Memorial Day!

IMG_7062


These breakfast cups are the perfect recipe for a day like Memorial Day.  They make any lazy, holiday morning breakfast wonderful.  These were brought to the school I work at by I very sweet mother and I instantly fell in love with them.  You see, I do not like eggs and almost every breakfast/brunch recipe I come across is mostly egg with a few other ingredients.  This recipe however is mostly other yummy ingredients with a tad bit of egg to hold it all together.  Enjoy!

  
Southwestern Breakfast Cups
Recipe Notes
The filling mixture for this recipe can be made 2-3 days before and stored in the refrigerator overnight.  This makes the morning preparation even quicker.  Also, I have always had alot of the filling leftover so if you are making this for a big group, you can buy a couple more can of biscuits without having to double the filling.  You can also half the filling and have enough for about 15-20 biscuits.
Ingredients
2 to 3 cans buttermilk biscuits
1 small can diced green chilies, drained
1 small can diced black olives, drained
8 oz. cream cheese, softened
2 cups finely chopped ham
1/2 cup diced onion
3 to 4 cups shredded sharp cheddar cheese
1 egg
Directions
1. Preheat oven to 350 degrees. 
2. Mix everything, except biscuits, in large bowl, set aside. 
3. Spray muffin pans with cooking spray. 
4. Put 1 biscuit into each cup spreading it up the sides of the cup. 
5. Put about 1 heaping tbs of ham mixture on top of each biscuit. 
6. Bake 20 minutes or until biscuits begin to brown.
7. Serve immediately.

5.23.2009

Weekend Update: Topsy Turvy Tomato Planter... Week 2

 
So here is my Topsy Turvy Tomato Planter at Week 2.  If this is the first time you have seen this post, I will be tracking the Topsy Turvy Tomato planter to see if it really lives up to what its infomercial claims... up to 30 lbs. of tomatoes this summer. Compared to week 1, I haven't seen too much progress.  The leaves are a little bushier, which I think is all I can hope for at this point.  I noticed a few holes in some of the leaves from little pests so I doused it with organic bug repellent.  Other than that, just been watering about a gallon a day.  Stay Tuned!

5.22.2009

Introducing Mr. Hungry and his favorite meal.


How can I possibly be sharing my kitchen and recipes and not ever address my biggest taste tester, my husband, Mr. Hungry.  Whether it's the fact that he will eat anything I put in front of him (at least once), or the countless times he has walked in the kitchen and said, "What do you think you could whip up in here for me to eat?"... the name just fits.  
And what better addition to his introduction than his favorite meal: Steak Sammies.  I have to say this is one of those times where my picture just doesn't do the recipe justice.  I'm sure someone could take a more glorious picture of these, but you should trust me and try them! These sandwiches are perfect for so many reasons and especially because they only have 5 ingredients.  The combination of the havarti cheese and seasoned steak and onions pairs perfectly.  I feel like you can't go wrong feeding this sandwich to any man in your life.
Steak Sammies
Serves 2
Recipe Notes
I have tried these sandwiches with both new york strip steak and ribeye.  I personally go for whatever is on sale and I am sure they would be just as delicious with another type of steak.  If you have a thin piece of steak, you can even skip the slicing step and use a whole piece of steak on your sammies.  It is important to let the onions cook in the balsamic vinegar for awhile, but if the edges start to turn black, turn down the heat.   Make sure you let the steak come to room temperature before grilling for best cooking results.
Ingredients
Olive Oil
1 white onion thinly sliced
2 tablespoons balsamic vinegar
4 slices havarti cheese
2 portions of boneless ribeye or ny strip steak
French Baguette

Directions
1. Heat 1/2 tablespoon of olive oil over medium heat.
2.  Add onions and balsamic vinegar and cook for about 15 minutes, stirring occasionally.
3.  Heavily salt and pepper steak and grill until steak is cooked medium.
4.  Allow steak to cool and slice into 1 inch thick slices.
5.  Slice baguette in half horizontally and cut two 6 inch sections.
6.  Lightly brush with olive oil and toast in the oven for 5 to 10 minutes.
7.  Remove bread and stack steak, onions and then cheese on top.  Top with other side of bread and serve immediately. 


5.20.2009

Toasted Pecan & Goat Cheese Salad

This is by far one of my favorite salads.  It is simple and pairs well with meats as well as pastas.  I have made many different variations of this and it really goes well with most types of salad greens.  On this particular day, I used a spring mix of bagged salad, but baby spinach works really well too.  I found this delicious recipe for balsamic-rosemary vinaigrette in Everyday Food magazine and I have to say the fresh dressing makes all the difference.  You can definitely use a store bought balsamic dressing if you are short on time, but I think it is worth the effort... Enjoy!


Toasted Pecan & Goat Cheese Salad
Serves 4
Ingredients- salad

1 bag of salad (either spring mix or baby spinach)
1/2 cup crumbled goat cheese
1/2 cup toasted chopped pecans (see below for details)
1/4 cup balsamic-rosemary vinaigrette
Ingredients- balsamic rosemary dressing
Recipe adapted from Food Everyday Magazine March 2009
1/3 cup balsamic vinegar
1 tablespoon dijon mustard
1 small clove of garlic
1 tablespoon fresh rosemary leaves
2 tablespoons water
1/2 teaspoon coarse salt
1/4 teaspoon pepper
1/2 cup extra virgin olive oil
Directions- Salad
1. Combine all ingredients except dressing and toss.
2.  Pour dressing over salad just before serving.
Directions- Dressing
1. Combine all ingredients but the olive oil in a blender.
2.  Blend until mixture has a smooth consistency.
3.  While blender continues to run, remove lid and add olive oil slowly.
4.  Continue to blend until mixture is combined.
Dressing may be refrigerated up to two weeks and also works well as a marinade for chicken and pork chops.


To toast pecans, heat a dry skillet over medium heat.  Add pecans and toast about 5 minutes, shaking every once in awhile.  Keep your eye on these... they can burn quickly!


5.19.2009

Simply Steamed Artichokes

It's artichoke season and I couldn't be happier. Sometimes, the simplest things to make are the best. Steamed artichokes is one of my all-time favorites. It's great for so many reasons: you can make them for just yourself or a crowd, they are very healthy (if you leave out the dipping in butter part... but life's too short as far as I'm concerned), they are quick and can also look impressive. I know this is a very simple recipe, but if you have never done it before, some might be intimidated.


So, below I have posted step by step instructions for steaming an artichoke and how to eat the best part when you are done with the leaves... the artichoke heart. They are great as an appetizer or as a side when in season. Otherwise, they are still available, but pretty expensive. For best quality and cheapest price, enjoy your artichoke dishes in the spring.


Simply Steamed Artichoke
Below, is a step by step in pictures of steaming artichokes.
Trim pointy edges of each artichoke leaf.
Steam for 30 to 45 minutes, depending on size of artichoke.  To tell when artichoke is done, pull a leaf off.  If the root side of the artichoke leaf is tender when scraped off with your teeth, the artichoke is done. 
Don't forget about the best part: 
The Artichoke Heart!
When you have eaten all the leaves completely off, this is what you will be left with.  Take a sharp knife and diagonally cut a circle so you can remove all the "small hairs" on the heart.
As you can see, the center has been removed, and you can eat the rest of the heart.  It is best cut up into bites and dipped in leftover butter.

Stay tuned for a stuffed artichoke recipe in the upcoming weeks!

5.17.2009

Herbed Goat Cheese Toasts

When you have extra fresh ingredients left over from other meals, it's nice to spice something up like bread to accompany a meal. In this case, it was goat cheese left over from a salad and some whole grain bread I hated to see go bad. I have a slight obsession with cheese, which will be more apparent in the future, so in my eyes, anything sprinkled with goat cheese, could never do you wrong. If you feel the same, I invite you to make these light & delicious toasts. 
Herbed Goat Cheese Toasts
ingredients 
whole grain sandwich bread
crumbled goat cheese
fresh rosemary
olive oil

step by step
1. Preheat oven to 350 degrees.
2. Drizzle bread with olive oil.
3. Sprinkle crumbled goat cheese & rosemary on bread.
4. Finish off with a little kosher salt or coarse sea salt.
5. Place on preferably a rack with slits in it or straight on to the wire rack in the oven
(allowing air to circulate under the bread helps it to get a tad crispy)
6. After 5 to 10 minutes, check bread and when cheese is melted,
put on broil for a couple of minutes to brown the cheese.
7. Watch carefully to not burn while on broil.
8. Remove from oven & enjoy.


5.16.2009

Topsy Turvy Tomato Planter... Follow my experiment!

I know I know, this is one of the ugliest things you could invite into your backyard (however, when all you have is a concrete slab and a dirty shed as a backyard, you are really not killing any ambiance).  If you have somehow missed the infomercials on this product, it is the Topsy Turvy Tomato Planter.  It is a way to grow tomatoes upside down, and if this little contraption delivers what it advertises, I could yield up to thirty pounds of tomatoes this summer.  So I invite you on my journey to find out if this really works!  I will share my progress every Saturday in my new post, "Weekend Update: Topsy Turvy Tomato Planter." Disclaimer: I do live in Houston, Texas where you can fry an egg on the street starting in early April so take note of that uncontrollable element as we watch this little thing do it's magic.  Stay Tuned!

5.14.2009

Quick Cheese Grits

After making the same old steamed rice or pasta as a side, I was ready for something new.  These quick cheese grits are delicious and can almost always be on hand.  By simply combining the packets of instant grits I sometimes eat for breakfast, and leftover cheese, I have a whole new side.  They have worked great for me using all sorts of cheeses...whatever you have leftover.  Now of course nothing beats my mom's baked garlic cheese grits (which I hope to feature at some point), but these are perfect for a quick and easy weeknight side.  Even if you have not been a fan of grits in the past, I would encourage you to try these because they come out thick and creamy.  I used them as a side for Lemon Olive Chicken and they paired perfectly.   
Quick Cheese Grits
Recipe Notes
On this particular evening, I used shredded colby cheddar cheese because that is what I had on hand.  However I have used cheddar, parmesan and gruyere before as well.  Cheddar is my favorite!
Ingredients
2 packets of Instant Grits (you may also use two servings of grits from a cylinder of instant grits)
1/2 cup of shredded cheddar cheese + a sprinkle of cheese to serve
1 cup water
Directions
1. Combine all ingredients in a microwave safe bowl and stir to combine.
2. Microwave on high for 1 minute.
3.  Stir to ensure it is heated through.
4.  Remove from the microwave and divide into two servings.
5.  Sprinkle with cheese and serve immediately.


5.12.2009

Lemon Olive Chicken for Two

One pan dishes are definitely some of my favorite .  I adapted this recipe from Real Simple online to be perfect for two people.  Sometimes you just don't need leftovers or you only have two chicken breasts on hand, and this is definitely a way to spruce up plain old chicken.  The chicken really soaks up all the flavor from the wine, shallots and olives for a very tasty chicken breast.  


Lemon Olive Chicken
Adapted from Real Simple Online 
Recipe Notes
As I mentioned earlier, I paired down this recipe to be for two.  However, I have tweaked it so that you have more sauce.  My first test with the original recipe left me wanting more sauce.  The original recipe calls for green pitted olives.  I used pimiento stuffed olives that tasted great, so try whatever you think you like.  If you use bigger olives, I would suggest halving them.  A note about chicken cutlets: Chicken cutlets simply mean thinly sliced chicken breasts.  There are a couple of ways to achieve this.  If you go to a grocery store like Central Market, you can pick up a package of chicken breasts and ask the butcher to pound them thinner.  I will say that I asked for this service at my local grocery store, Kroger, and they laughed at me.  So, other options... companies like Pilgrim's Pride sell cutlets or you can simply slice a chicken breast horizontally so that you have two thinner halves.  It is essential for this kind of cut to get a good saute.  
Ingredients
2 tablespoons all-purpose flour
1/2 teaspoon ground cumin
2 teaspoons lemon zest, plus 1 tablespoon fresh lemon juice
kosher salt and pepper
2 chicken cutlets (if cutlets are small, you can do 2 pieces per person)
2 tablespoons olive oil
1 shallot, thinly sliced
1 cup pitted green olives
1/2 cup flat-leaf parsley, roughly chopped
1/2 cup dry white wine  (I used a chardonnay)
Directions
1. Pat chicken dry with a paper towel to remove all moisture.  Mix the flour, cumin, zest, 1/2 teaspoon salt, and 1/2 teaspoon pepper in a shallow bowl. 
2.  Dredge chicken cutlets on both sides in the mixture.
3. 
Heat 1 tablespoon of the oil in a large skillet over medium-high heat.  Saute chicken until no longer pink in the 
 middle.... about 5 to 6 minutes.  Remove chicken from pan and cover with foil to keep warm.
4. Wipe out the same skillet  with a paper towel and heat the remaining oil.
5.  Add the shallot and cook until soft, 5 to 7 minutes. 
6.  Stir in the olives, parsley, lemon juice, and wine and bring to a low boil.
7.  Add chicken to the pan and spoon sauce, olives and shallot on top.  Cover the pan and simmer on low for about 5
minutes. 
8.  Divide among plates and serve immediately.


On the right, is a shallot.  If you were already aware of what this is, then just ignore.  I will admit when I first started cooking a lot in Waco, this was a foreign item to me and they were no where to be found in those glorious Waco grocery stores.  It is about the size of garlic and can usually be found near garlic, ginger or onions in a grocery store.  

5.10.2009

Fresh Tomato Sauce with Whole Wheat Spaghetti

I love convenient canned products, but some items are always be better fresh in my book.   Tomato sauce is one of them and this recipe couldn't be simpler.  This is the first thing I created without following a recipe to a tee and I can still remember the joy I had oh so many years ago of making something without a cookbook... and it actually being tasty.  I have since spruced it up a little, but it is still very simple and delicious!  The best thing is, you really can't mess it up and it makes great leftovers... Enjoy!
Fresh Tomato Sauce with Whole Wheat Spaghetti
Recipe Notes
I will definitely say this recipe is its best during the summer.  It allows the flavor of the fresh tomatoes, garlic and basil to really shine through.  Using summer tomatoes at their peak produces the best results.  Any variety of tomato can work, but I think vine-ripened gives the best flavor.  Having tried several types of pasta, I think angel hair whole wheat pasta is definitely the best.  I enjoy it way more than when I have made it with whole wheat spaghetti.  
Ingredients- Tomato Sauce
2 tablespoons of olive oil
2 cloves of garlic, finely chopped
4 medium sized vine-ripened tomatoes, roughly chopped (bite size chunks)
1/4 teaspoon salt
1/4 cup of torn basil leaves
salt & pepper
1/4 cup parmesan cheese (1/2 cup if you like things extra cheesy)
Pasta
8 oz. angel hair whole wheat pasta (approximately half a box)
Directions
1.  Heavily salt a pot of water and bring to a boil.
2.  Cook pasta according to directions; drain pasta and return to pan.
3.  While pasta is cooking, heat olive oil over medium heat in a separate pan. (do not let the heat get too hot or it will burn the garlic)
4.  Add garlic and let simmer for about 30 seconds (do not let it brown).
5.  Add tomatoes and salt; bring to a slight boil.
6.  Add torn basil leaves and turn heat down to medium low.
7.  Let simmer for about ten minutes, stirring occasionally.  Taste the sauce and add extra salt and pepper to taste. 
8.  Add pasta and sauce together over low heat. 
9.  Right before serving, toss with parmesan cheese.
Serves: 2 main course servings or 4 side servings
this recipe is my first in a category called skinny cook.  this category is for healthy recipes.  If you were to stick to recipes only in this category, I believe that is exactly what you would be... a very skinny cook.  Good luck with that though.  I myself think life is just not fun without a fresh strawberry cupcake every now & then. 

5.07.2009

Angel Hair Pasta with Shrimp & Pesto... from leftovers.

I am very picky about leftovers. I often think that meats get a little funky or if something sits there too long, I just don't want to touch it again.  And even if they do taste good, who wants to eat the same meal for 3 days in a row?  However, when something reheats well it is worth having on hand so you don't have to cook from scratch every night. With just a tiny adjustment, you have a completely different meal! This meal is an extra bonus because it combines the leftover Angel Hair Pasta with Spicy Shrimp from yesterday's post, and the pesto from the chicken pesto sandwiches posted on April 28th.  So not only do you already have these ingredients, but you make a whole new meal in less than 5 minutes! The flavors go together perfectly. 


Angel Hair Pasta with Shrimp & Pesto
Recipe Notes
The amounts in this recipe will vary a little.  Depending on how much pasta you have leftover, adjust pesto accordingly.  If you don't have tons of pasta and shrimp leftover, use whatever you do have as a side to grilled chicken. My favorite pesto is found at Central Market in the prepared foods aisle.  You really can't beat homemade pesto, but this is pretty close!
Ingredients
2 servings of Spicy Angel Hair Pasta with Shrimp (half of the recipe)
3-4 tablespoons of pesto
Handful of parmesan cheese (optional)
Directions
1.  Heat shrimp pasta in the microwave for about 1 minute or until heated through.
2.  Stir in pesto one tablespoon at a time until covered with desired amount.
3.  Heat an additional 30 seconds.
4.  Sprinkle shredded parmesan cheese on top (optional).
Serves 2

5.06.2009

Angel Hair Pasta with Spicy Shrimp

shrimp pasta 3


This is a great dish I found from Real Simple online, which I peruse all too often for easy, yummy meals. I found this to be so easy and the frozen shrimp makes it ideal to throw together on any night of the week without having to have a lot fresh ingredients on hand. I hate nothing more than buying alot of fresh ingredients that end up going bad by the time I even get to make the meal. You don't have to worry about that with this dish, but it still tastes very light and fresh. The fresh basil is not part of the recipe, but just something I had on hand from my basil plant. This was a great meal fresh, but I have to say the leftovers were even better! The sauce had a chance to soak into the noodles and was wonderful. Also, I am not a spice person by any means so this is definitely not really spicy, but the red pepper flakes add a great kick.
pasta collage
the best way to quickly thaw shrimp...
simply run frozen shrimp under cold water for 10 minutes.

Angel Hair Pasta with Spicy Shrimp from Real Simple Online
Recipe Notes
I used angel hair pasta and it turned out great.  At the end, I also sprinkled some shredded parmesan cheese.  If you have some on hand, I recommend it, but it is not crucial to the dish.
Ingredients
3/4 pound angel hair pasta or spaghetti
1 tablespoon olive oil
2 cloves garlic, chopped
1 pound frozen peeled and deveined medium shrimp, thawed
3/4 cup dry white wine
1/4 teaspoon crushed red pepper
kosher salt
2 tablespoons butter
Freshly grated parmesan cheese (optional)
 Directions
1. Cook the pasta according to the package directions. Drain the pasta and return it to the pot.
2. Meanwhile, heat the oil in a large skillet over medium heat.
3. Add the garlic and cook, stirring, for 1 minute (do not let it brown).
4. Add the shrimp, wine, red pepper, and 1/2 teaspoon salt.
5. Simmer until the shrimp are opaque, 2 to 3 minutes.
6. Stir in the butter until melted.
7. Toss the pasta with the shrimp mixture and top with parmesan if using.

Serves 4.  Great meal for two because leftovers make a great lunch the next day.

5.05.2009

Special Strawberry Cupcakes...for a very special day.

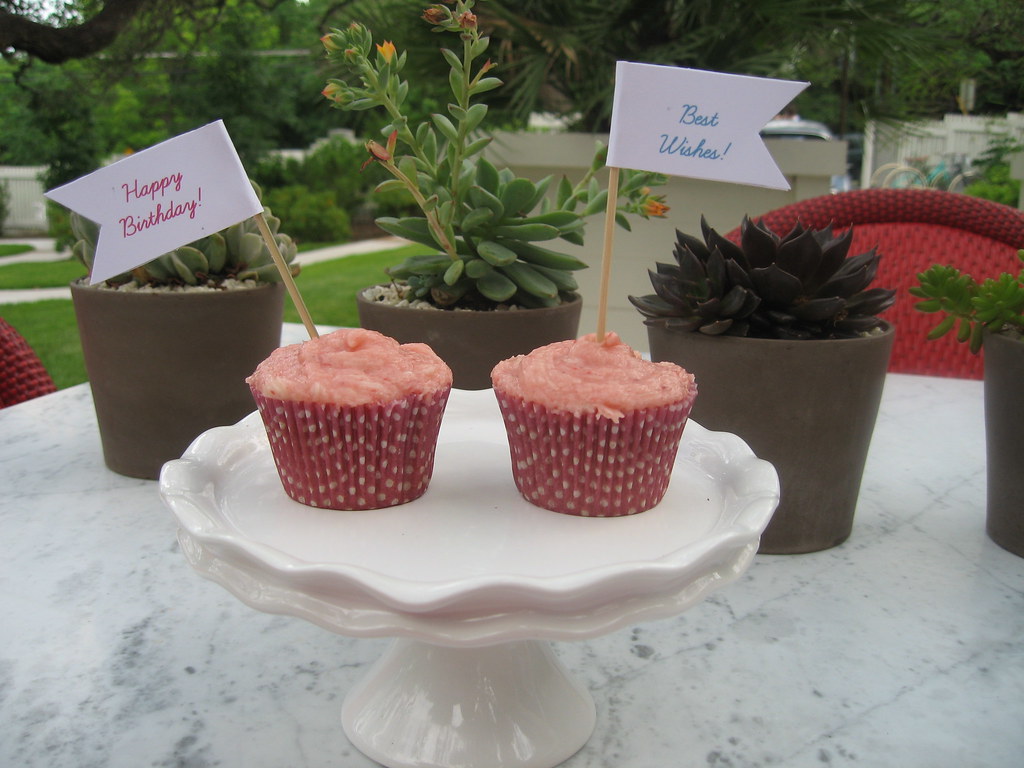
One of my best friends, Allison (who I have a long history of cooking with) had a very big day last week. It was her birthday and to her surprise, she was proposed to as well. We have cooked in everywhere from our dorm at college to a class in Italy and made cookbooks to journal our adventures as well. So for this day, I decided to make some fresh strawberry cupcakes that are acclaimed as the Sprinkles' recipe for strawberry cupcakes and icing on Martha Stewart's website.

Now I have to say Martha, I think you have been a little bit duped. When I first saw how they turned out, I could tell immediately the icing did not look the same as the cupcakes I have had at Sprinkle's bakery. However, whatever recipe they are, they were a hit! The cupcakes are barely sweet, which ends up being a perfect compliment to the very sweet and refreshing strawberry icing.


I can't tell which was more of a challenge, the seemingly endless steps and bowls used to make these (which only produced 11 cupcakes by the way... okay okay, maybe it could have been 12 if I hadn't helped myself to some of the delicious batter) or trying to keep them in tip top shape on my journey to Austin. But, as you can can see, they made it!


This is the first post of a category I will feature on here: Labor of Love Recipes. For the most part, I like to write about quick and easy recipes. These were definitely not quick or extremely easy. However, these kinds of recipes are definitely worth making if one of the following circumstances is true: it is for a very special occasion, the taste is worth the time, or it is for very special company. In this case, all three were true!


Strawberry Cupcakes
Sprinkles Recipe on Martha Stewart Website
Recipe Notes: 
This recipe got mixed reviews on Martha's website. Some said they did not get great results, but others raved about it. I will suggest having the ingredients exactly as they say. For example, butter at room temperature as well as milk and eggs. Also, I used fresh strawberries for the cupcakes and frozen for the icing. I highly recommend these for a special occasion!
Ingredients for cupcakes
2/3 cup whole fresh or frozen strawberries, thawed
1 1/2 cups all-purpose flour, sifted
1 teaspoon baking powder
1/4 teaspoon coarse salt
1/4 cup whole milk, room temperature
1 teaspoon pure vanilla extract
1/2 cup (1 stick) unsalted butter, room temperature
1 cup sugar
1 large egg, room temperature
2 large egg whites, room temperature


Ingredients for Strawberry Icing
1/2 cup whole frozen strawberries, thawed
1 cup (2 sticks) unsalted butter, firm and slightly cold
Pinch of coarse salt
3 1/2 cups confectioners' sugar, sifted
1/2 teaspoon pure vanilla extract


Directions for Cupcakes
1. Preheat oven to 350 degrees.


2. Line a 12-cup muffin tin with cupcake liners; set aside.


3. Place strawberries in a small food processor; process until pureed.


4. You should have about 1/3 cup of puree, add a few more strawberries if necessary or save any extra puree for frosting; set aside.


5. In a medium bowl, whisk together flour, baking powder, and salt; set aside.


6. In a small bowl, mix together milk, vanilla, and strawberry puree; set aside.


7. In the bowl of an electric mixer fitted with the paddle attachment, cream butter on medium-high speed, until light and fluffy.


8. Gradually add sugar and continue to beat until well combined and fluffy.


9. Reduce the mixer speed to medium and slowly add egg and egg whites until just blended.


10. With the mixer on low, slowly add half the flour mixture; mix until just blended.


11. Add the milk mixture; mix until just blended.


12. Slowly add remaining flour mixture, scraping down sides of the bowl with a spatula, as necessary, until just blended.


13. Divide batter evenly among prepared muffin cups.


14. Transfer muffin tin to oven and bake until tops are just dry to the touch, 22 to 25 minutes. 

15. Transfer muffin tin to a wire rack and let cupcakes cool completely in tin before icing.


Directions for Icing
1. Place strawberries in the bowl of a small food processor; process until pureed.


2. In the bowl of an electric mixer fitted with the paddle attachment, beat together butter and salt on medium speed until light and fluffy.


3. Reduce mixer speed and slowly add confectioners' sugar; beat until well combined.


4. Add vanilla and 3 tablespoons strawberry puree (save any remaining strawberry puree for another use); mix until just blended.


5. Do not overmix or frosting will incorporate too much air.


6. Frosting consistency should be dense and creamy, like ice cream.


Have extra strawberry puree?  Put it in a freezer bag with the date.  
Add to smoothies or other breads within 3 months.