
 I'm pretty sure last weekend will become a permanent life/food memory.
Definition of life/food memory: When you eat something amazing that happens to be on a perfect day so that the combination of the day and food will forever be remembered if you ever taste the food again.
Examples:
Eating a clown cone from Baskin Robbins... immediately takes me back to my eighth birthday where I chose to have these cones instead of a cake. Really great decision and the day is forever engrained in my head.
Having a bite of Texas cornbread (need to share the recipe soon)... immediately envision my mushroom haircut-self, wearing a cowboy hat and my favorite red boots, on Go Texan Day in first grade thoroughly enjoying our authentic Cowboy meal.
Are you with me? Come on, I know you have some.
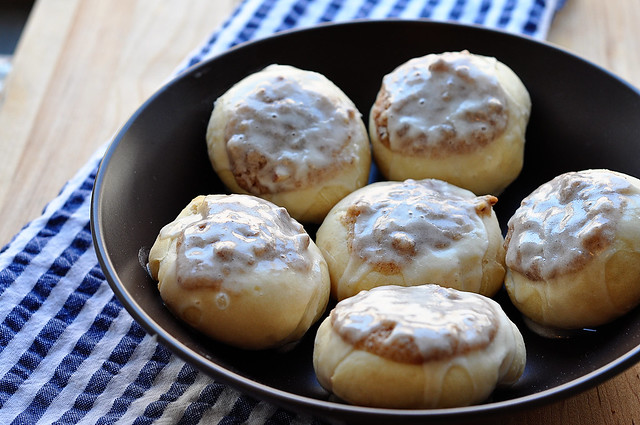
I made these cinnamon buns on a day that I will never forget. I felt good/normal for the first time in three months, and it was one of the first fall afternoons in Houston where you have to be happy because you are not sweating when you walk to your car. It is totally engrained.
Now back to that three months of not being here. Where have I been might you ask? Trying my hardest to get through each and every day while feeling so nauseous, I wanted to do nothing but cry... not even eat.
I've got a bun in the oven too and it has completely taken me under for a full three months. So if any of you out there have experienced "morning" sickness morning, noon and night I can totally sympathize with you. Hallelujah, it is gone for the most part or at least only hits me in waves. So as you can see, these buns were made on a very historic day for. Living through three months of misery and finally feeling semi normal again and wanting to cook was a huge and wonderful day in my book.
This surprise little bun is due on April 10, 2013 and we couldn't be happier.
Until then, let's make cinnamon buns!
I use to be totally thrown off by dough recipes with yeast and all those steps so I made sure to do a step by step for all those who love picture steps as much as I do.
Here we go...
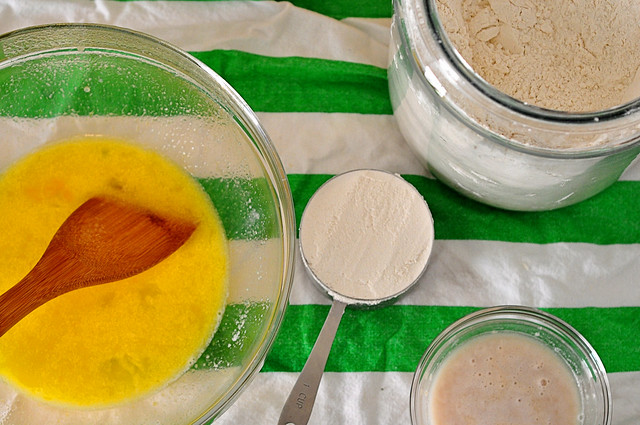
First we are going to gather our dough ingredients. Let's talk about that milky looking mixture at the bottom right. It's warm water and yeast. If you want to get real technical and get out a thermometer, you want warm water between 105 and 115 degrees F. If you want to get not so techie, run your finger under the hot water. The water should feel hot, but not too hot where it is burning your finger.


Now back to that three months of not being here. Where have I been might you ask? Trying my hardest to get through each and every day while feeling so nauseous, I wanted to do nothing but cry... not even eat.
I've got a bun in the oven too and it has completely taken me under for a full three months. So if any of you out there have experienced "morning" sickness morning, noon and night I can totally sympathize with you. Hallelujah, it is gone for the most part or at least only hits me in waves. So as you can see, these buns were made on a very historic day for. Living through three months of misery and finally feeling semi normal again and wanting to cook was a huge and wonderful day in my book.
This surprise little bun is due on April 10, 2013 and we couldn't be happier.
Until then, let's make cinnamon buns!
I use to be totally thrown off by dough recipes with yeast and all those steps so I made sure to do a step by step for all those who love picture steps as much as I do.
Here we go...
First we are going to gather our dough ingredients. Let's talk about that milky looking mixture at the bottom right. It's warm water and yeast. If you want to get real technical and get out a thermometer, you want warm water between 105 and 115 degrees F. If you want to get not so techie, run your finger under the hot water. The water should feel hot, but not too hot where it is burning your finger.
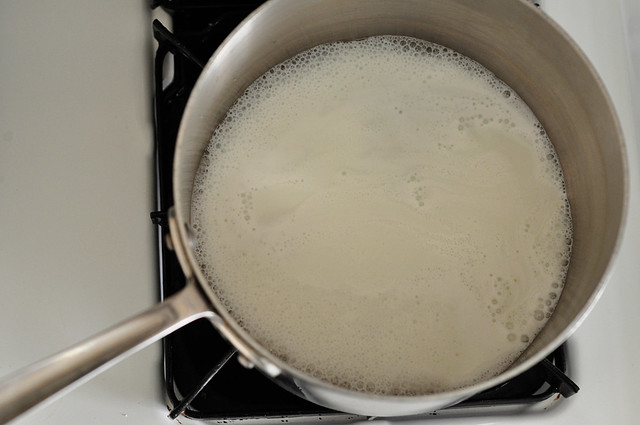
Let's also chat about scalded milk. Technically, it is milk that has been heated to it's boiling point. Visually, it looks like the picture below. If this is a totally foreign concept to you, check out this quick little video. See the notes section of the recipe below for more detail.
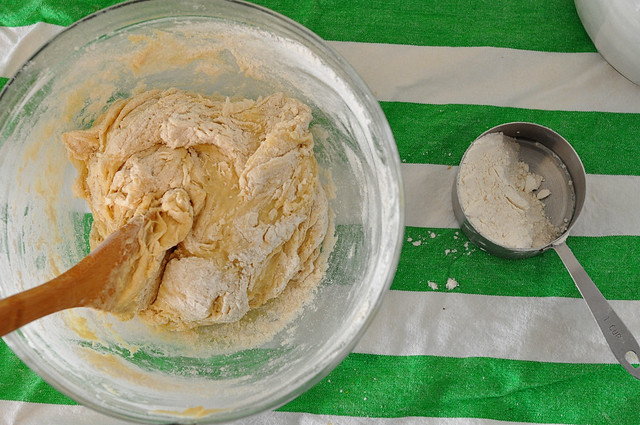
You can do your mixing with a hand or stand mixer, but I went the old fashioned way with a wooden spoon. First you throw together the milk, sugar, butter, salt and egg. Then, add two cups of the flour and mix well.
Add the yeast mixture and mix. Next up, we are going to slowly add up to two more cups of flour.
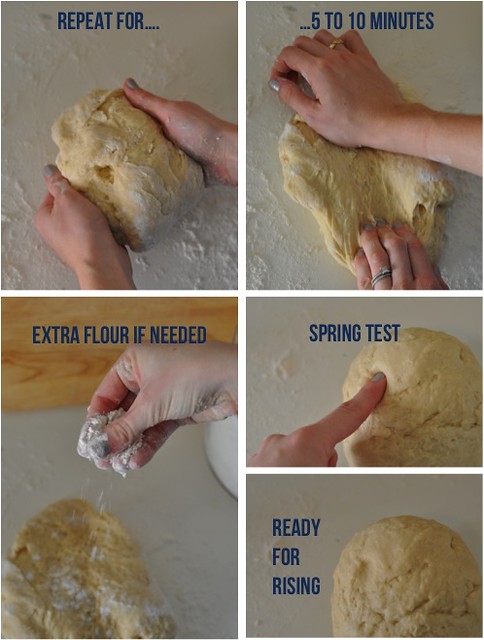
Basically you want to keep adding flour until the ball of dough is not overly sticky. Out of the few times I have made these, I have used all four cups in total and if I have any left at this point, I end up using it during the kneading process if dough still seems sticky.
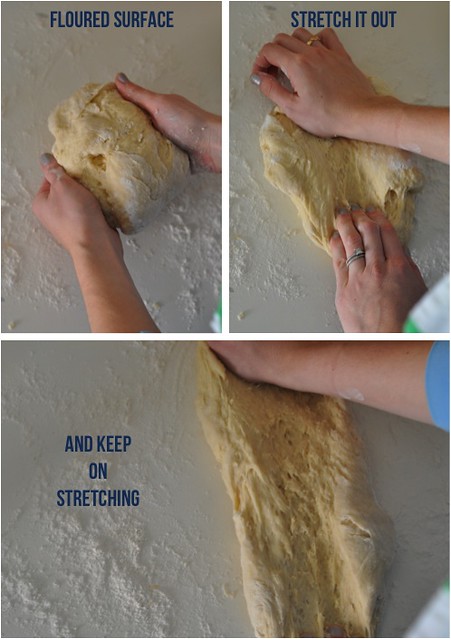
Time for kneading/ a quick calorie burn. Put your back into it and you can probably burn enough calories to eat an extra cinnamon roll. Your dough is sufficiently kneaded when you perform the spring test at the bottom right. Simply press in gently and the dough should spring back at you just a little.
Lightly grease a large bowl with oil. I have used olive oil or vegetable oil... just a very thin layer. Add dough ball and cover tightly with plastic wrap. Allow to dry in a warm dry place for 1 1/2 hours.

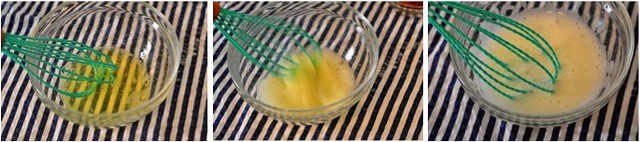
While the dough is rising, make the cinnamon mixture filling (a.k.a. the best part). You want the egg whites to be nice and frothy. Beat for a few minutes until they go from yellow and translucent to light, bubbly and pale.
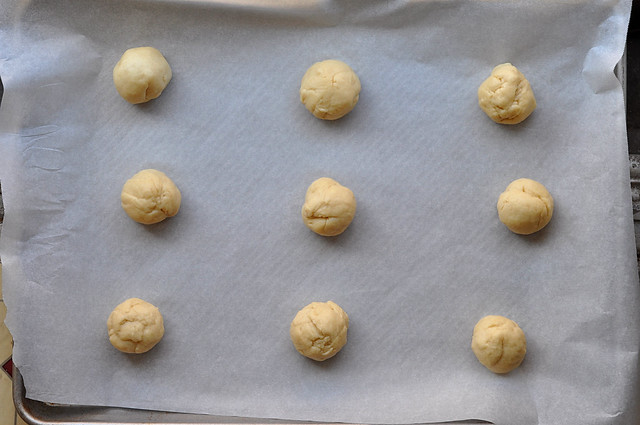
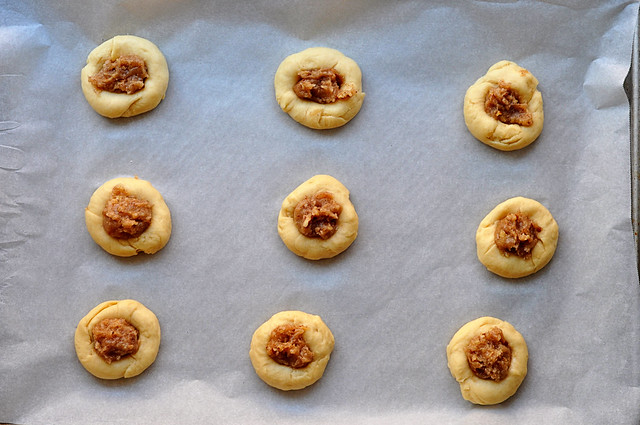
Punch down the dough. Pull off pieces of dough and form small balls, 1 1/2-inches round.
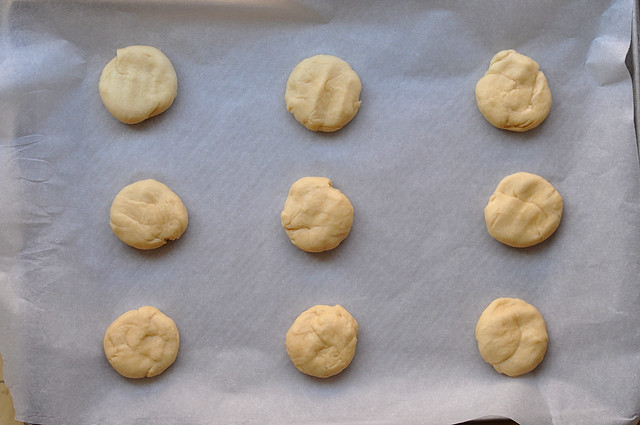
Press each ball down to flatten slightly.
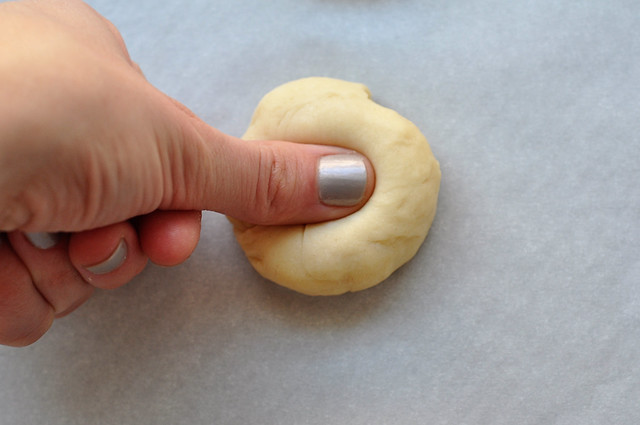
Make an indentation in the middle of each ball.
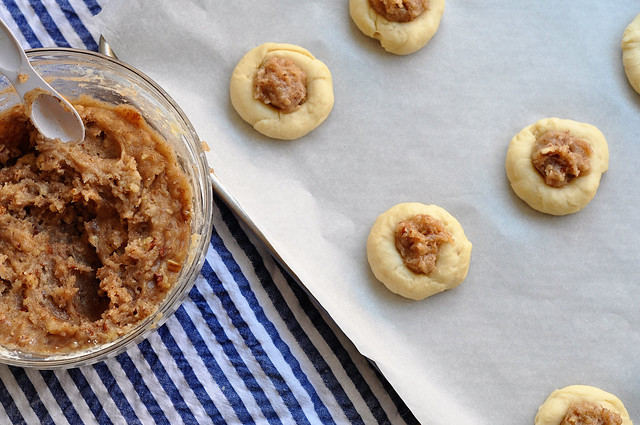
Put a heaping spoonful of the mixture into each thumbprint.
(I went for 1 1/2 teaspoons in each... the more the merrier)
At this point, you have two options. Allow to rise for an additional 20 minutes and then bake. Or cover loosely with plastic wrap and refrigerate for up to 24 hours. When ready to bake, allow to sit on the counter for 20 to 30 minutes. Really you have three options... freezing is another... we will discuss in the recipe.
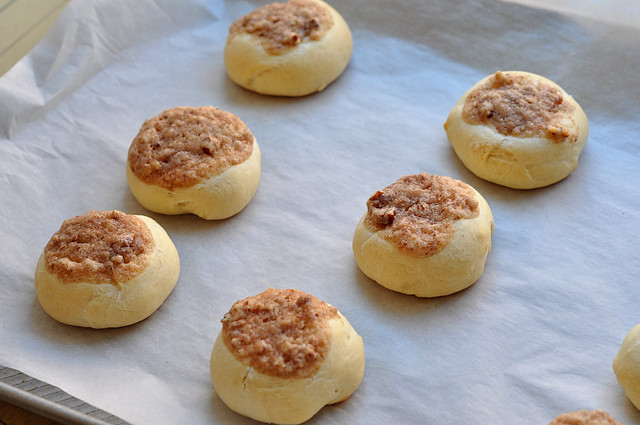
Bake for about 30 minutes, until the edges are slightly golden brown.
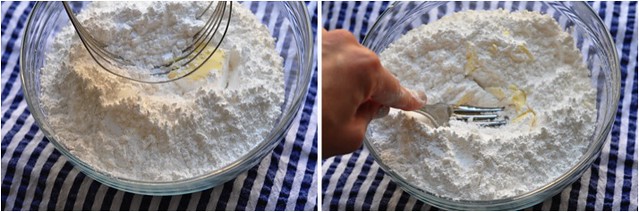
Time to make the icing. You can use a pastry blender or a fork to cut the butter into the sugar.
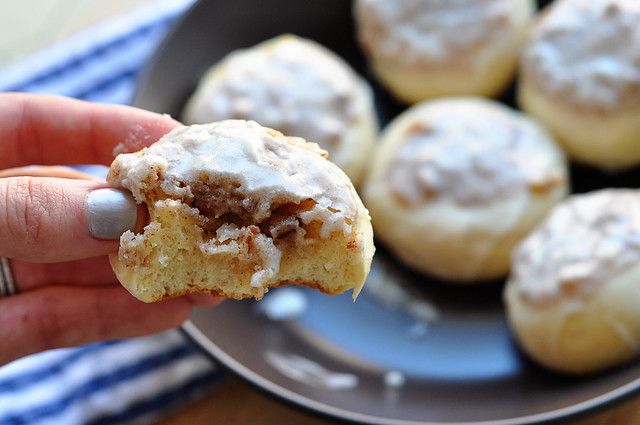
Spoon over rolls while still warm.
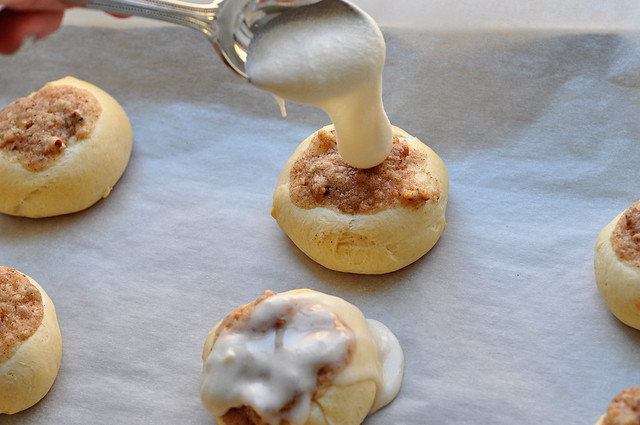
Admire.

Eat while they are still nice and warm.
Cinnamon Buns
Adapted from the Junior League of Houston's Stop and Smell the Rosemary and Paula Deen's Cinnamon Rolls
Note about yeast/ water mixture: Do not be intimidated by yeast recipes. Once you get the temperature of the water down, you will never fail. If you have any sort of thermometer, I would use it the first couple of times so that you get the hang of what 105-115 degree F water feels like. If you do not, there is no need skip this recipe. My highly scientific way of finding the right temperature, goes as follows. Turn on your hot water. Run you finger underneath it. You are looking for the hottest water that your finger can handle and stay there. If it starts to burn at any point, the water is too hot. But I have found you need pretty warm water because you once you add it to a cold bowl, the water will cool off a bit.
Note about kneading dough: Whether you are making pizza, bread or cinnamon buns, the act of kneading the dough is all the same. Depending on many factors, you might need to adjust your process. If the dough feels really sticky once you get it on your floured surface, add a little extra flour at a time. Once you feel that your dough is sufficiently kneaded, you can perform the spring test. Ball up the dough and lightly press your finger into the dough. It should bounce back a little... not completely bounce back, but it should not stay indented with no movement.
Note about cutting butter into sugar: When you make the icing, you will need to "cut butter into the sugar." If you have a pastry blender, this is definitely the time to use it. If you do not, a fork can perform the job just fine.
Yield: 12 to 14 buns
Ingredients
Dough
1/4-ounce package yeast1/2 cup warm water
1/2 cup scalded milk
1/4 cup sugar
1/3 cup unsalted butter, melted
1 teaspoon salt
1 egg
3 1/2 to 4 cups all-purpose flour
olive oil, for coating the bowl
Cinnamon Mixture
1/2 cup sugar
1/2 cup all-purpose flour
1/2 teaspoon ground cinnamon
1/3 cup ground pecans
1/4 cup (1/2 stick) unsalted butter, melted
1 egg whites, beaten and frothy
Icing
4 tablespoons unsalted butter, room temperature
4 cups powdered sugar
2 large egg whites
1 teaspoon vanilla extract
1/4 teaspoon cream of tartar
4 teaspoons milk
Step by Step
Heat oven to 350 degrees F.
In a small bowl, dissolve yeast in warm water and set aside. In a large bowl mix milk, sugar, melted butter, salt and egg. Add 2 cups of flour and mix until smooth. Add yeast mixture. Mix in remaining flour gradually until dough is easy to handle. Knead dough on lightly floured surface for 5 to 10 minutes. Lightly grease a large bowl with olive oil (vegetable oil will work as well). Place dough in well-greased bowl, cover and let rise until doubled in size, usually 1 to 1 1/2 hours.
While dough is rising, make the cinnamon mixture. Combine sugar, flour, cinnamon, pecans, butter and egg whites in a small bowl.
When doubled in size, punch down dough. Pinch off pieces of dough and shape into 1 1/2-inch balls. Place on a baking sheet covered with parchment paper about 3 inches apart. Press each ball down to flatten slightly. Make an indentation in the center of each ball. Top with a heaping spoonful of cinnamon mixture... at least 1 1/2 teaspoons. You can pile the mixture high on the dough and it will bake nicely into the hole. Allow to rise for an additional 20 minutes on the counter while you make the rest of the cinnamon rolls. Bake for about 30 minutes, until the edges are slightly golden brown.
While cinnamon buns are baking, make the icing. Cut butter into sugar, using a pastry blender or a fork, until it resembles cornmeal. Add egg whites, vanilla and cream of tartar. Beat until thoroughly combined, slowly adding milk. Set aside. Remove buns from baking sheet immediately. Spoon icing over each bun while still warm.
To bake in the next 24 hours:
Prepare buns through the step of adding a heaping cinnamon mixture in the middle of each one. Cover loosely with saran wrap and refrigerate for up to 24 hours. When ready to bake, remove from the refrigerator and allow to sit on the counter for 30 minutes before baking.
To freeze:
Buns can be completely baked and iced and then frozen for up to one month.
Lightly grease two 9-inch cake or pie pan (any shallow pan with edges will work such as a square or rectangular cake pan). When buns come out of the oven, remove from the baking sheet immediately and place as many as possible in the greased pan, tucked in tightly next to each other. When slightly cooled, but still warm, pour the icing over the rolls. Allow to cool completely. Tightly wrap in Saran wrap and then foil. Freeze rolls for up to one month. When ready to eat, preheat the oven to 350 degrees. Reheat cinnamon rolls for about 15 minutes, until heated through. They taste like they just came out of the oven!


Congrats sweet friend! :-)
ReplyDeleteCongrats! I've mIssed the little kitchen!!
ReplyDeleteYaY ! So glad you ar feeling better, I've been thinking about you and hoping you were feeling better. Please take care and take it easy.
ReplyDeleteMaking these and LOVE the step by step pics
From You friend Cheryl (Lucky Girl)
These look so good! I cannot wait to try them. Congratulations on your baby. What an exciting time!
ReplyDeleteSuch exciting news! Babies are the biggest blessing and yours will be fed so well! :)
ReplyDeleteJoy
What fun news! Congratulations, and I am one of the many that feels your pain with the constant nausea. It is the absolute worst. These cinnamon buns look like a perfect way to celebrate feeling normal again.
ReplyDeleteCongratulations! I just had to thank you for your Tuscany cooking school recommendation. I was able to participate in the class today, while in Florence, and had the most wonderful experience. Five hours later, and I'm still so full that I can barely breathe! It was so fun, informative and memorable; I appreciate the suggestion more than you know!
ReplyDeleteI am so happy to hear that!! Yay! I hope you had a wonderful trip. I would do anything to go back.
DeleteCongratulations! So happy you and your recipes are back! :) ( my first was a surprise too
ReplyDeleteThis is the perfect recipe for returning to the kitchen. You are so cute! Glad you are feeling better. Take care~
ReplyDeleteCongratulations! I can totally understand the not feeling too good thing. Not fun, but worth it for sure! I worked at Baskin Robbins as a teenager and forgot all about the clown cones. So cute!
ReplyDeleteCongratulations on your wonderful news! I'm sorry that your pregnancy has been so difficult, but fingers crossed that it will be smooth from here on in. Your cinnamon buns look awesome!
ReplyDeleteOh, I'm so glad you are back!!! My sister just emailed me to tell me that you were blogging again because we have talked many times about how we have missed your blogging. :) Glad you are back and congratulations on the baby!
ReplyDeleteCongrats~~ and what a sweet way to swing back into blogging!!
ReplyDeleteWelcome welcome welcome back my friend :D
ReplyDeleteI am soo happy! And what an inredible way to get back into it :)
Cheers
CCU
I love so many things about this post. First of all, congratulations! That is so exciting. Second, I loved clown cones as a child so much and I haven't thought about them in years. Makes me want to get one. And third, this recipe looks amazing!! Keep up the good work and glad you are back.
ReplyDeleteCongratulations Ashlea...I am very happy fro you :)
ReplyDeleteYour cinnamon buns look awesome...like the idea of having the goodies concentrated on the top.
Hope you are having a wonderful week!
I am so glad you are feeling better; this is a beautiful post...and so excited about the arrival of your "kitchenette."
ReplyDeleteCongratulations on your bun in the oven, and it must be great to feel like eating again! Your cinnamon buns looks fantastic. Wish I could grab one off the screen.
ReplyDelete