9.20.2011

Shredded Pork Tacos

Shredded Pork Tacos
It's September.  It's back to school time.  And whether a real school schedule plays into your life at all or not, September still signifies that summer is coming to an end.  Long summer meals have come to a close and it seems like September is time to get into a routine and buckle down a bit.

It's time to get some things streamlined.

It's time to have dinner magically appear for you when you get home from a long day of work.

It's time to break out the slow cooker.

Sorry...talking about crock pots just doesn't sounds nearly as jazzy as slow cookers. 

And we don't have to go into the fact that I don't have a new fancy schmancy slow cooker.  I have my grandmother's crock pot with all the paisley flowers and delicate riboons strewn about that just screams "I was trendy and cool in 1982." The point is... old timey or brand new, sleek chrome or ridiculously retro, you need a crock pot.  Splurge if you want or pick up a rockin one from a garage sale... they all do the same thing... cook slowly.

This thing is a life saver.

I feel a slow cooker is as close as the modern world has gotten to having that maid, Rosie, from the Jetson's.  Consider this jewel your dinner robot.

I'm feeling the need to really put mine to work this fall and winter so bust yours out and let's have dinner with none of the work and just one dish to clean.

These shredded pork tacos are a good place to start.

Tons of flavor and very few ingredients.   I thought this recipe was outrageous when I first saw it.  Cocoa powder and salsa?? Huh? But you won't believe the deep flavor you get from mixing these two. It's dynamite.


From my little kitchen to yours... Enjoy.
Shredded Pork Tacos
Shredded Pork Tacos
Adapted from Real Simple
Recipe Notes
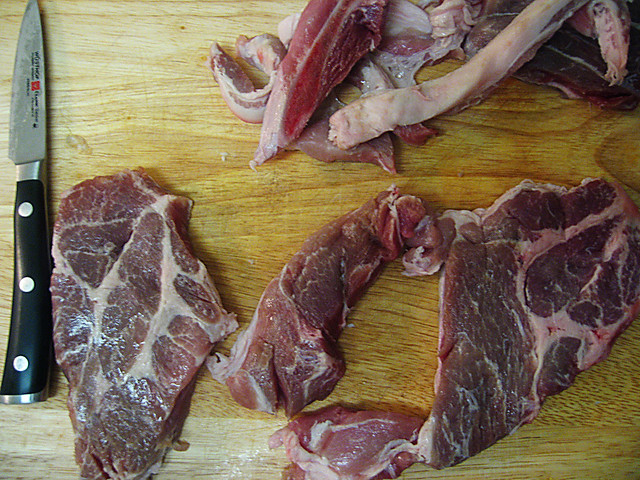
If you are not use to buying pork, just branch out and do it.  I avoided recipes like this for a long time because I knew nothing about pork, but for the most part, you cannot mess it up.  If in doubt, tell the butcher what you are making and he will steer you in the right direction.  You can find slices of boneless pork butt in most grocery stores.  I chose boneless pork butt steaks because they cook faster and are available in smaller portions than a whole pork butt.  You can easily double or triple this recipe.  Whatever your slow cooker allows.  There should be enough sauce to add a pound or more of pork without having to double the sauce.  I cooked the meat for 7 hours on low.  You could cook for about 5 hours on high or up to 8 hours on low.  See picture below for how to prepare the meat for cooking.  See picture for trimming pork butt.
For a healthier option, you can use boneless pork loin.  Cut into slices to make sure all is covered by sauce. If you are using boneless pork loin, you will have a lot more meat because you have no fat to trim off.
Ingredients
2 cups store bought salsa
2 tablespoons chili powder
2 tablespoons dried oregano
2 tablespoons unsweetened cocoa powder
kosher salt
1 1/2 lbs. boneless pork, either pork butt or boneless pork loin (see recipe notes for options)
Corn tortillas
1/4 cup fresh cilantro sprigs
1/2 cup sour cream
1 lime
shredded cheddar cheese (optional), for serving
Step by Step
In a crock pot, combine the salsa, chili powder, oregano, cocoa powder and 1 teaspoon of salt.  Remove any large strips of fat from pork (see pictures below).  Add meat and coat to cover.  Cover with lid.  Cook on high for 4 to 5 hours or on low for 7 to 8 hours until meat is tender and pulls apart easily.

Twenty minutes before meat is done, heat oven to 350 degrees.  Wrap corn tortillas in foil and bake until warm, about 15 minutes.  While tortillas are warming, remove pork from slow cooker and set on medium sized plate.  Using two forks, shred pork and smother with sauce from slow cooker.

Build tacos starting with pork and add a few sprigs of cilantro, and a dollop of sour cream to each taco.  Add shredded cheddar cheese if you would like.  Squeeze lime juice over the top of the tacos and serve.

Makes 4-8 servings.  Check recipe notes to see how using different cuts of meats gives different amounts of servings.


If you are using a pork butt or pork shoulder, remove any large strips of fat from pork before adding to the crock pot.  This will not be necessary with a boneless pork loin or other types of lean cuts. 
trimming the pork

9.12.2011

Crostinis... the best thing since sliced bread.

crostini copy
So technically crostinis are sliced bread, but the kicker is the slight toasting and the drizzle of olive oil that turns sliced bread into a sophisticated crostini.

However, it is the endless options and possibilities of what goes on top of these suckers that really gets me hyped up.  Sauteed mushrooms, tomato bruschetta, cheese and a drizzle of honey, olive tapenade... the possibilities are literally endless.  

The Italians have it right.  Make one thing... say a mushroom sauce, and eat it on pasta today and leftovers can become a mushroom crostini tomorrow.  Reason #682 my soul feels most at home in the Tuscan hills.

So this is barely a recipe, but getting this down now will make your future very bright.

From my little kitchen to yours... Enjoy.


A classic Italian way of eating crostini is to toast the bread and slice a garlic clove in half.  Rub the garlic on one side of the bread and then drench it in really good olive oil right before serving.   
crostini 3 copy
Crostinis
Recipe Notes
You can pretty much use any type of bread for crostinis, but I have two favorites... either a baguette or ciabatta bread.  You just want a nice sturdy loaf... not sandwich bread.  
Ingredients
Baguette or country-style Italian bread, sliced about 1/2 inch thick. 
Olive oil
Step by Step
Preheat oven to 375 degrees.  Lightly brush each side of the bread with olive oil and place in a single layer on a baking sheet.  Bake them until golden, about 12 to 15 minutes.  Check halfway through and if bottoms are browned but tops are not, flip each piece over and finish toasting. 

To serve plain, drizzle with extra olive oil and sprinkle with kosher salt.  

Topping Ideas:
Fresh mozzarella cheese and a thin slice of prosciutto
Marinated tomatoes to make Tomato Bruschetta
Olive tapenade
Drizzled with balsamic vinegar
Goat cheese and thinly slice roasted red peppers

9.08.2011

Caramel Corn

Caramel corn 
Hope you had a wonderful Labor Day weekend.

I learned quite a bit on my Labor Day.

We headed out of town for a one night trip to a small town called Salado, TX, & it turned into a 3 day vacay with two of our friends from college.  We simply woke up every morning and decided we shouldn't go home.  This led to a weekend of cooking, playing board games, eating, watching movies and antiquing.  It was me with three boys in tow.   And yes, we are all in our twenties... not our sixties.  We stayed in a house my family owns in this small town, but doesn't visit often.  With no supplies for a 3 day trip and little to work with at the house, we pulled quite a bit together.

I felt like I had quite a few revelations.  Here's my top 5 from the weekend....


College football games can be extremely exhilarating.


A classic Labor Day meal can totally be made without a grill.  Oven BBQ chicken, potato salad, cheddar corn fritters and a summer brew.
(recipes coming soon)


Lots of help in the kitchen.


Three boys in the kitchen is actually a dream come true.  I have never seen prep work come together so quick.

Labor Day breakfast


Leftover apple crumb makes a pretty killer breakfast.  Especially when you add a savory breakfast sandwich and a cup of coffee.

Caramel corn


Cracker Jacks have nothing on homemade caramel corn.


You should totally make this.  You should totally share.

But that's the problem... it's hard to share. It's addicting.

Even for me who always picks the cheddar popcorn over the caramel popcorn in those trio cans that seem to always show up around Christmas.  You know what I'm talking about, right?  I know you know, that I know, that you all know what I'm talking about.

Gosh, I love those things.  Maybe I should start a search for a good cheddar popcorn and we could throw together our own popcorn trios by Christmas?!

But back to the good stuff.  This popcorn keeps it crunch while being bathed in a sweet and caramely layer that gets a slightly salty kick from the peanuts that go oh so well to finish it off.  It slowly bakes for an hour, which makes it even more perfect for a long weekend or a holiday where you can slow things down a bit.

From my little kitchen to yours... Enjoy.

Caramel Corn
Adapted from DamGoodSweet by David Guas and Raquel Pelzel
Recipe Notes
It is possible to do this without a candy thermometer, but I would not recommend it if you are not use to this sort of thing.  Make this your excuse to buy yourself one.  It will be fool proof with candy thermometer.

I used grocery store brand "natural" flavored popcorn.  Newman's Own also has a natural flavor.  You can use air popped as well.  Just buy a popcorn with no flavors like butter or kettle corn and you should be fine.  If you air pop yourself, lightly salt it afterwards.  You want popcorn that tastes pretty plain with a hint of salt.

10 cups of popped popcorn took about 1 1/2 bags for me.

Measure everything out and get your tools ready before you start making the caramel.  Things will go very fast once you begin and you won't have time to grab things.

Ingredients
10 cups popped popcorn (see recipe notes)
1 cup packed light brown sugar
¼ cup light corn syrup
6 Tablespoons unsalted butter, melted
¼ teaspoon salt
½ teaspoon baking soda
2 teaspoons vanilla extract
1 cup lightly salted peanuts

Step by Step
Preheat the oven to 250°F. Line a rimmed baking sheet with parchment paper.

Coat a large mixing bowl with nonstick cooking spray, and dump the popcorn into the bowl, taking care to pick out and discard any unpopped kernels.

In a medium saucepan, whisk together the brown sugar, corn syrup, butter, salt and 2 tablespoons of water. Bring to a simmer over medium-high heat. Continue to simmer, whisking often, until the mixture reads 250°F on a candy thermometer, about 3 to 4 minutes. Immediately remove the pan from the heat, and whisk in the baking soda and vanilla. Quickly pour the hot caramel over the popcorn. Use a rubber spatula to gently fold the caramel into the popcorn, taking care to distribute it as evenly as you can. Stir in the peanuts, and transfer the mixture to the prepared baking sheet. Bake for 1 hour, stirring and turning the popcorn with a spatula every 20 minutes. Remove from the oven, and place on a cooling rack for 20 minutes. Gently break up the popcorn, and serve.

Store in an airtight container for up to 5 days.

Makes about ten cups.

9.01.2011

Strawberry Brown Butter Bettys

strawberry brown betty
I took myself pretty seriously the other day about the whole end-of-great-fruits-is-near announcement.  I actually made these the same day I made the peach bars because I just had the need to get all this fresh fruit into different buttery, crumbly wrappers before it went bad.  

I guess it all started when I went overboard on stocking up on fruit in the first place.  And once I had eaten my 18th bowl of fresh berries and whipped cream for dessert, I decided to try a few fancier things.  But don't get me wrong... the fresh whipped cream is just as important on these sussies as it is for fresh fruit.

I have to say my vote went to the peach bars.  However, we were a divided household.  Mr. Hungry loved these.  So who knows where you'll end up, but at the end of the day, they are both top notch fruity little desserts. 

From my little kitchen to yours... Enjoy. 
brown bettys
Have you ever made anything with brown butter?  You totally should.  Think deep buttery golden flavor.  Woah, who knew butter had a whole different dimension?  This is the color you're going for.
brown butter
Did you know white bread loves brown butter?  Oh yeah, it soaks this stuff right up and becomes nice and crispy.  I have never loved plain old sandwich bread so much.
brown bettys 2

brown bettys 3

brown bettys 4

strawb bettys


Strawberry Brown Butter Bettys
Adapted from Smitten Kitchen
Recipe Notes
Every strawberry is different so you will want to adjust the amount of sugar depending on the sweetness of your berries.  These were made with farmer's market berries that had great flavor, but were not overly sweet. 
Ingredients
3/4 stick unsalted butter
1 teaspoon granulated sugar
6 slices white sandwich bread, crusts removed
1/4 cup packed light brown sugar
1/2 teaspoon lemon zest, finely grated
1/8 teaspoon salt
1/2 cup panko bread crumbs(Japanese bread crumbs)
2 cups strawberries, stemmed and sliced into thin slices
Fresh whipped cream, for serving (lightly sweetened)
Step by Step
Preheat oven to 350°F and adjust oven rack to the middle of the oven.

In a small pot, melt butter over medium heat. Once melted, reduce heat to medium-low. The butter will melt, then foam, then turn clear golden and finally start to turn brown and smell nutty. If you have been at it for awhile and have not seen any brown, turn the heat up slightly.  Stir butter frequently and scrape up any bits that might stick to the pan. Don’t take your eyes off the pot as while you may be impatient for it to start browning, the period between the time the butter begins to take on color and the point where it burns is less than a minute. The process should take 4 to 6 minutes.  Remove from heat.

Lightly brush the muffin cups with the brown butter, then sprinkle with granulated sugar. Roll bread slices with a rolling pin to flatten. Brush both sides with additional brown butter, then gently fit into muffin cups.

Stir together brown sugar, zest, salt and panko, then add strawberries and toss to coat. Stir in remaining brown butter. Heap strawberry mixture into cups, pressing gently.

Cover pan with foil and bake 15 minutes. Uncover and bake until strawberries are very tender, about 10 minutes more. Let stand 5 minutes before removing from pan. Serve warm or at room temperature with a dollop of fresh whipped cream.

Can be covered with foil and kept refrigerated for 2 to 3 days.  You can reheat for a few minutes in the oven or eat at room temperature.  Just make sure to whip up some fresh whipped cream.

Makes 6 muffin- size desserts. 

8.26.2011

Peach Crumb Bars

peach crumb 1
The end is near.
peachcrumb2
The signals are mixed.  Around these parts, you could be fooled by the signs, but I feel very certain I am right... the end is near.peachcrumb3
The end of amazing strawberries, peaches, blueberries, blackberries and such is coming.  Pretty much the only clear sign at this point is the calendar.  Because if I was going off the weather, you would think we are smack dab in the middle of it.peachcrumb4
But we are not so run... don't walk.... to the grocery or farmer's market and get in on the freshness and flavor of fruit that can only be found in the summer.

Did I mention these are extremely easy?  Yep, run.

From my little kitchen to yours... Enjoy.
peachcrumb5
Oh, what do you know, we already have another desperate need for that fresh whipped cream.  This is truly the icing on the cake... the cherry on top... whatever you want to call something that finishes out a dish in a perfectly wonderful way.
peachcrumb6
Peach Crumb Bars
Adapted from Smitten Kitchen & Allrecipes.com
Recipe Notes
Even in peak season, peaches can be extremely hit or miss.  Depending on what kind of peaches you end up with, you might have to adjust a little bit.  Mine were great, but not overly juicy.  If you have really juicy peaches, you might want to add a tad bit more cornstarch.  When I first made these bars, we used really sweetened whip cream because the crust was not overly sweet.  Somehow, as the days went on, they got a little sweeter so we still put a dollop of cream on top, but I used less sugar.
Ingredients
1 cup white sugar
1 teaspoon baking powder
3 cups all-purpose flour
1 cup cold unsalted butter (2 sticks or 8 ounces)
1 egg
1/4 teaspoon salt
Zest and juice of one lemon
4 heaping cups of chopped peaches
1/2 cup white sugar
6 teaspoons cornstarch
Freshly whipped cream for topping (click here)

Preheat the oven to 375 degrees F.  Grease a 9×13 inch pan.

In a medium bowl, stir together 1 cup sugar, 3 cups flour, and baking powder.  Mix in salt and lemon zest.  Use a fork or pastry cutter to blend in the butter and egg.  Dough will be very crumbly and dry. Pat half of dough into the prepared pan.

In another bowl, stir together the sugar, cornstarch and lemon juice.  Gently mix in the peaches. Spread the peach mixture evenly over the crust.  Crumble remaining dough over the berry layer.  You might have a little crust left over.

Bake in preheated oven for 45 minutes, or until top is slightly golden brown.   Cool completely before cutting into squares. Bars are easier to cut after being refrigerated.  Top each bar with a dollop of fresh whipped cream. 

Store in refrigerator in an airtight container for up to one week.

Makes 24 bars or 36 very small rectangles.

8.23.2011

Fresh Whipped Cream

Untitled
It's Tuesday.

You look like you could use a magic trick.  Nothin spices up a Tuesday like a little magic.

And I bet you this might be the tastiest magic trick you've ever seen. You also need this right now because it's the best {and easiest} dessert for this time of the year.  All you need is a little fresh whipped cream to make a bowl of fresh summer berries seem like a refreshing and fancy dessert.

And no, canned whip cream does not even come close to what this tastes like.  Sorry, but no.

Mr. Hungry was a little floored when he saw me whisk this up out of what he thought was liquid cream that only seemed to be useful for his coffee.

You just need a few dollops for small batches of berries so grab a whisk and this will be ready in minutes.

For bigger jobs, you might want to pull out the hand mixer or you could be whisking for quite awhile.

Summer berries are still at their prime so go ahead and put this at the top of your to do list before berries go back to being expensive and out of season.  Seriously... hurry.

From my little kitchen to yours... Enjoy.

Recipe Notes
The exact way you make this will depend on what you are making it for.  With fruit, I like to add a pretty good amount of sugar to make it sweet.  If you are adding a dollop to a pie or cake, you might want to only add a little bit of sugar because you already have so much sweetness.
If you are trying this for the first time, start with very little cream.  Watch how the process works and then add more.  If you are making more than one cup of cream, I would probably use a hand mixer (unless you have lots of time to whisk).
* Regular sugar or powdered sugar will work.  If you have powdered, use it.  If you don't, you do not need to buy any.  The only different is that you  need to add the regular sugar early in the process so that it has time dissolve into the cream.  Powdered sugar is preferable because after whipping, you can add more at the end to get to the exact sweetness you would like.
** A little vanilla goes a long way, but once again, the exact amount will depend on what you are making.  I always add a dash, but if I am putting cream on something that would be great with a vanilla flavor I add a little bit more.

What you need...
Heavy Whipping Cream
*Powdered Sugar or regular sugar
**Vanilla (optional)
Large bowl
Whisk

1.  Start with cold cream in a large bowl.  The colder the cream, the easier and faster it will whip.  Having a large bowl will also help quite a bit.
cream
2.  Time to start whipping.  Make wide strokes with a whisk, changing direction every so often.  This will help get air into the cream faster.  Bubbles will start to form.
cream2
3.  Now it's time put some muscle into it.
Exercising and making dessert at the same time?  This is just the best.
When the cream starts to thicken, add sugar and vanilla (if using).

Tip:  A good rule of thumb is two teaspoons of sugar for every cup of cream.  Adjust sweetness according to tasate.  Optional:  Add about a teaspoon of vanilla per cup of cream
cream3
And before you know it, you will have peaks that look like this.

Done! Seriously, we are done.  What was that, like 1 minute worth of work?  And you have great looking arms.

Ah, I love magic.
cream4

Keep in the refrigerator and serve within an hour of making.

Add a dollop to a bowl of mixed berries, perhaps a freshly sliced peach, or maybe on top of a piece of pie or chocolate cake.  But that means you cannot sit there and eat the whole bowl.  But no one's watching... maybe just the first batch... no one has to know.